
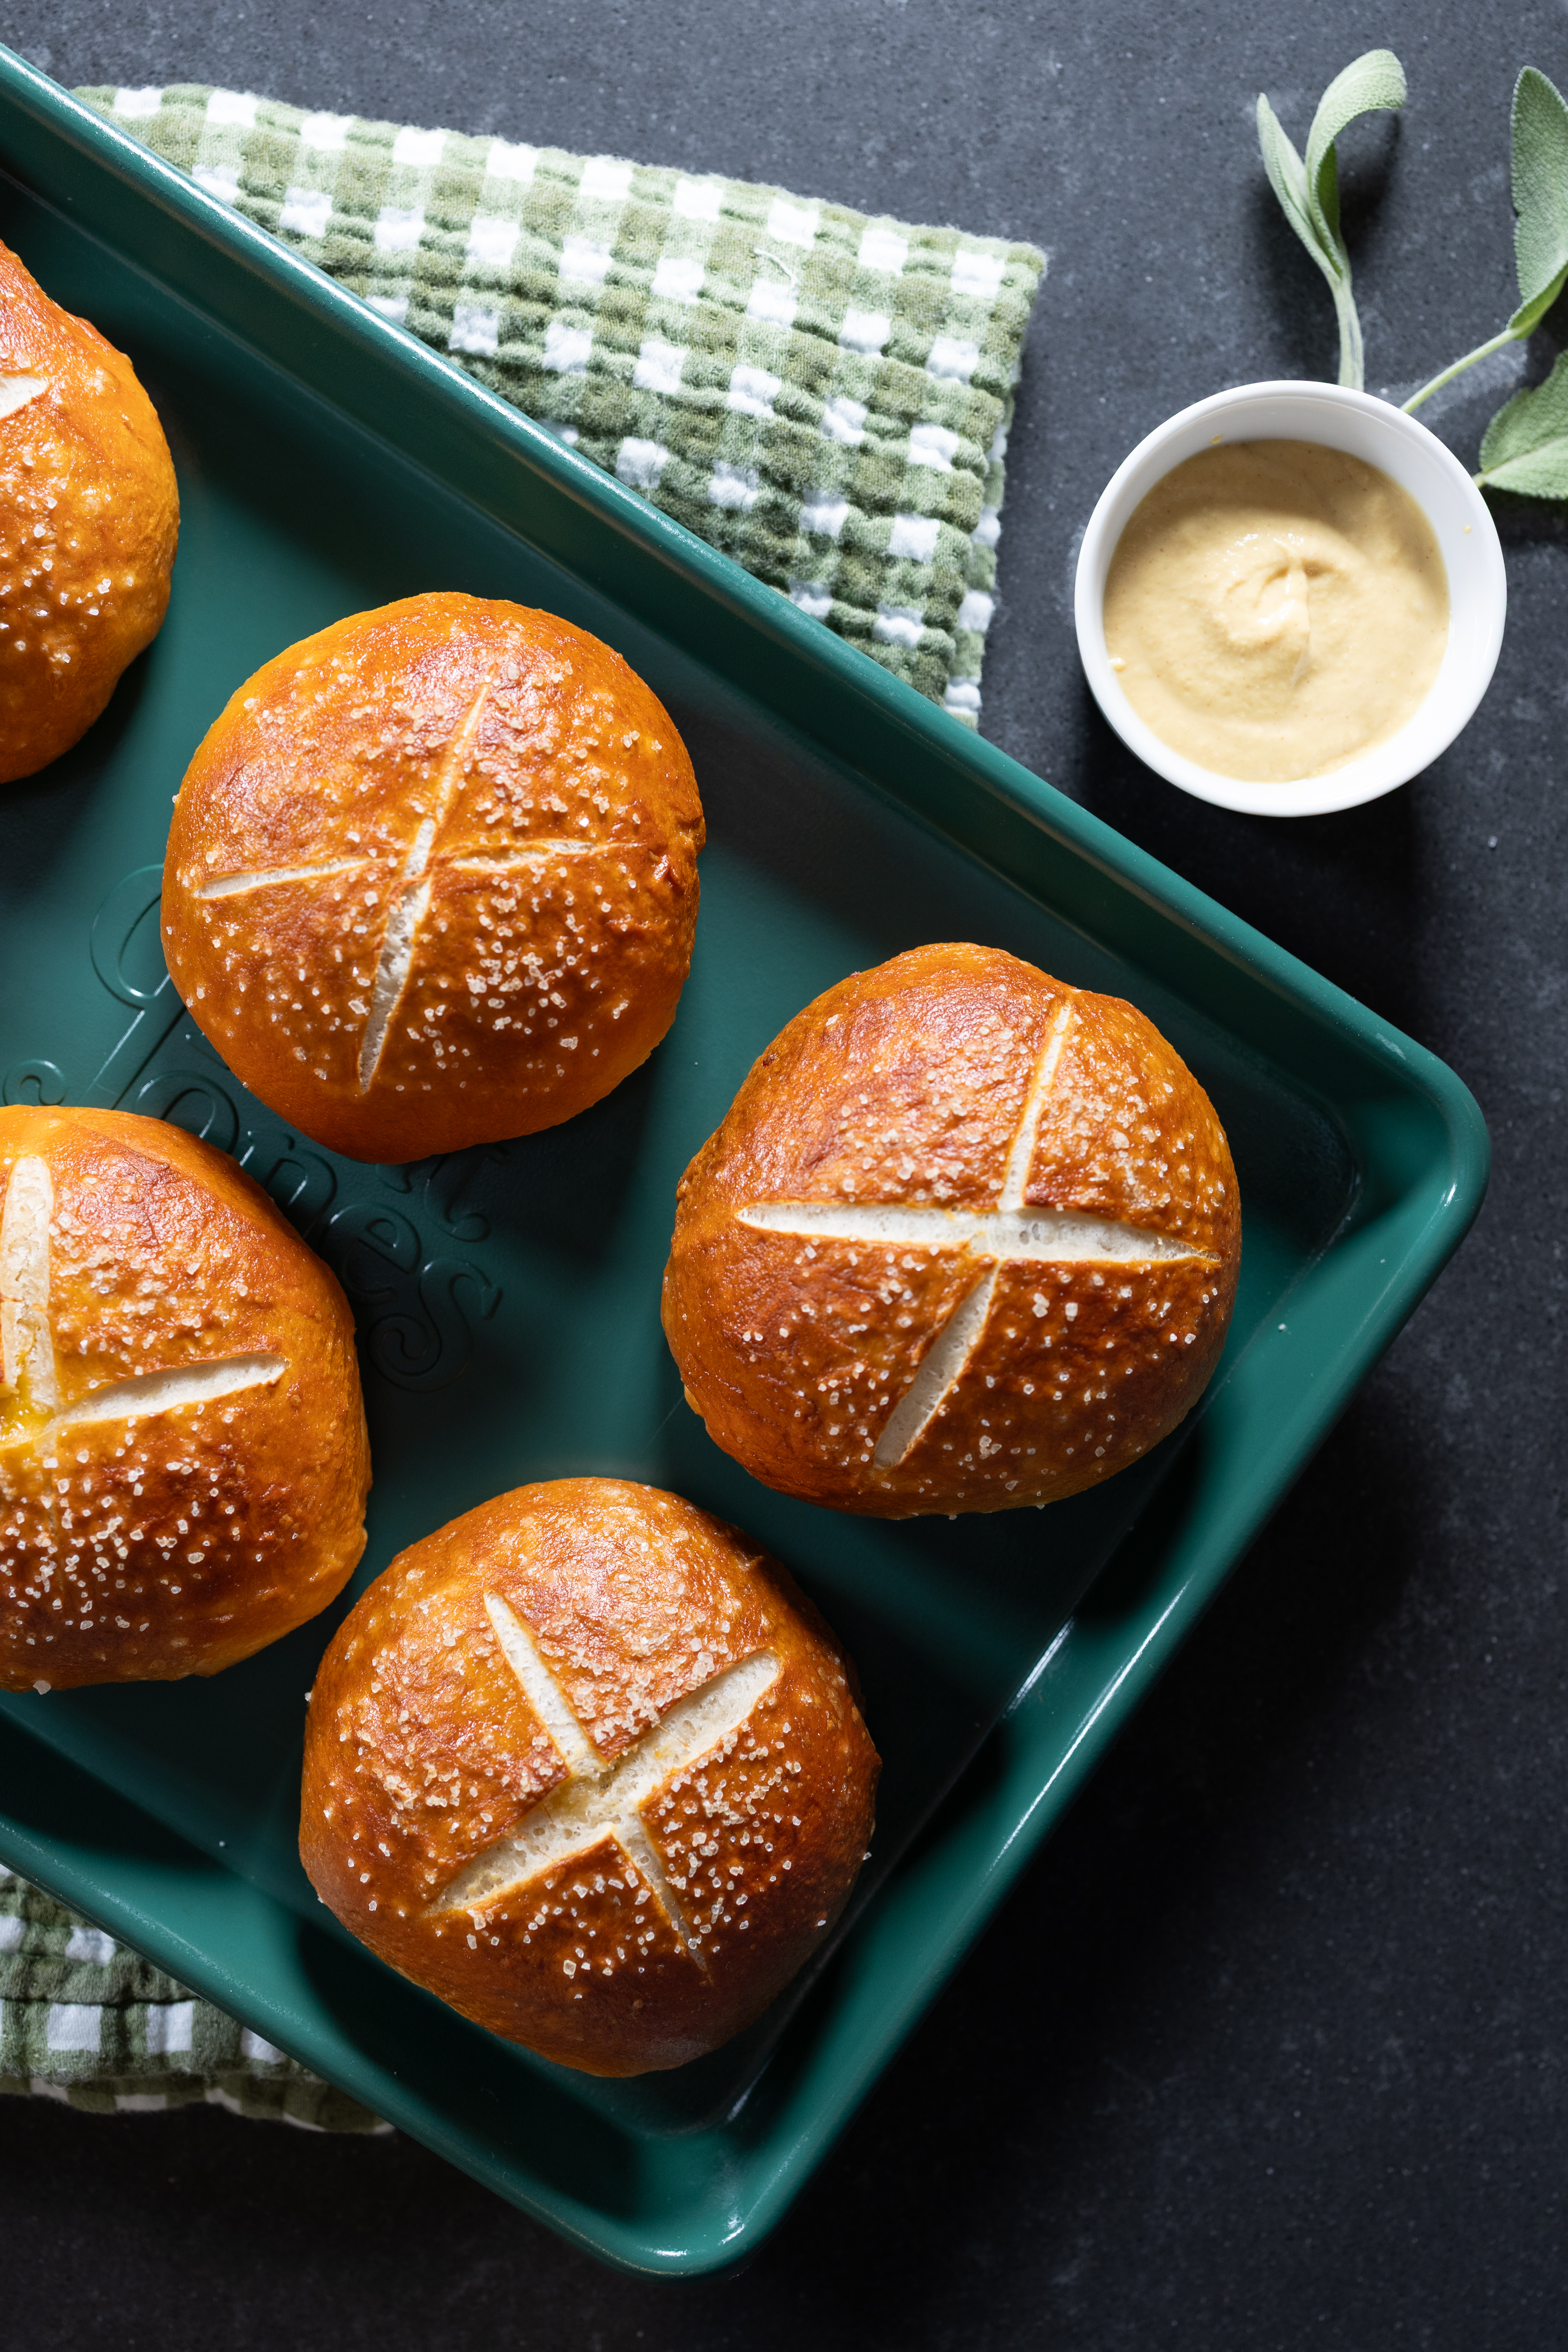
There are few things better than a warm soft pretzel, but stuffing one with savory sausage, melted sharp cheddar, and fresh sage might be one of them.
These Sage Sausage & Sharp Cheddar Stuffed Pretzel Buns have everything I want in a savory fall bake: a deeply golden, slightly chewy pretzel crust, a ridiculously soft center, plenty of coarse salt, and a warm, cheesy filling tucked inside.
And somehow, these were also my first time making homemade pretzels.
I went into this recipe expecting pretzel dough to be a little intimidating, but it ended up being so much more approachable than I expected. The dough is simple, the stand mixer does most of the work, and that quick baking soda bath is what transforms an otherwise soft bread dough into something that looks and tastes unmistakably like a pretzel.
They’re substantial enough to serve on their own, but they would also be such a good addition to a game day spread, fall party, or cozy weekend at home.

Table of contents
- Why You’ll Love These Stuffed Pretzel Buns
- What Makes Pretzel Dough Different?
- How to Know When Your Pretzel Dough Is Ready
- The Sausage, Sharp Cheddar & Sage Filling
- How to Stuff Pretzel Buns Without Losing the Filling
- Don’t Skip the Second Rise
- How to Get That Deep Golden Pretzel Crust
- How to Get Those Perfect X’s on Top
- Common Mistakes to Avoid
- Frequently Asked Questions
- Do I have to use a stand mixer?
- Can I use instant yeast instead of active dry yeast?
- How warm should the milk be?
- Can I use a different sausage?
- What kind of cheddar should I use?
- Can I leave out the sage?
- Why do pretzels need a baking soda bath?
- Can I use regular salt on top?
- How do I know when they’re finished baking?
- How to Store Sage Sausage & Sharp Cheddar Stuffed Pretzel Buns
- Make Ahead
Why You’ll Love These Stuffed Pretzel Buns
They’re unbelievably soft. The outside develops that classic slightly chewy pretzel crust while the inside stays pillowy and tender.
The filling is savory and cheesy. Sausage and sharp cheddar make these substantial, while fresh sage gives the filling a warm fall flavor.
They’re easier than they look. If homemade pretzels have always seemed intimidating, this is a very manageable place to start.
They’re made for sharing. One batch makes eight generously sized stuffed buns, perfect for setting out warm for a crowd.
They can go way beyond game day. Make them for a party, serve them alongside soup, add them to a fall spread, or eat one warm straight from the baking sheet. I won’t judge.
What Makes Pretzel Dough Different?
The dough itself is actually very similar to other soft yeast doughs. The part that gives a pretzel its signature exterior happens after the buns are shaped and proofed.
Before baking, each bun gets a quick dip in a hot baking soda bath. The alkaline solution changes the surface of the dough, encouraging deeper browning in the oven and helping create that distinctive pretzel flavor and slightly chewy crust.
So if you’ve ever wondered why you can’t simply shape bread dough into a pretzel and get the same result, the bath is a big part of the answer.
For this recipe, the buns only need about 20–30 seconds total in the baking soda bath. You’re not trying to cook them. It’s a quick treatment of the exterior before they head into the oven.
How to Know When Your Pretzel Dough Is Ready
Don’t focus only on the clock when kneading.
At first, the dough will look rough and shaggy. As it kneads, it should become smoother, more elastic, and begin pulling together around the dough hook.
The finished dough should feel soft and slightly tacky, but not excessively sticky.
Try not to compensate for a soft dough by immediately adding a lot of extra flour. A dough that stays slightly soft is part of what gives these buns such a tender interior once baked.
After kneading, let the dough rise until roughly doubled in size, about 1 hour depending on the temperature of your kitchen.
The Sausage, Sharp Cheddar & Sage Filling
The filling is intentionally simple because the pretzel itself already brings so much flavor.
Mild Italian sausage gives the buns a savory base, sharp cheddar adds plenty of cheesy flavor without disappearing into the sausage, and fresh sage brings in that warm, earthy flavor that makes these feel especially fitting for fall.
Cook the sausage completely before stuffing the buns and allow it to cool. You don’t want to put a piping-hot filling inside your beautifully risen yeast dough.
I also recommend adding the sage toward the end of cooking the sausage. It only needs a minute or two in the pan to become fragrant.
How to Stuff Pretzel Buns Without Losing the Filling
After the first rise, divide the dough into 8 equal portions.
Flatten each piece into roughly a 4½–5-inch round. Add the sausage and cheddar to the center, leaving enough exposed dough around the edges to close the bun comfortably.
Bring the edges of the dough up and around the filling, then pinch the seam very firmly closed.
This is one of the most important parts of the recipe. If there are gaps in the seam, melted cheese can escape during the baking soda bath or in the oven.
Place each finished bun seam-side down and gently shape it into a round.
Once all eight are filled, they only need one more short rise before their pretzel bath.
Don’t Skip the Second Rise
The buns get two rises total:
- The first rise happens after kneading, before the dough is divided.
- The second happens after the buns have been filled and shaped.
For the second rise, about 20–30 minutes is usually enough.
You’re looking for buns that appear slightly puffier and feel airy when gently touched. If you lightly press the dough, the indentation should slowly begin to spring back.
Your kitchen temperature will affect proofing time, so use the dough itself as your guide rather than treating the clock as an absolute.
How to Get That Deep Golden Pretzel Crust
Once the stuffed buns have finished their second rise, bring 8 cups of water to a boil.
Carefully and gradually add ½ cup baking soda. The water can foam considerably when the baking soda goes in, so use a large pot and don’t dump it in all at once.
Reduce to a gentler boil and lower the buns into the bath one or two at a time.
Give each bun about 20–30 seconds total, gently turning it halfway through if necessary so the entire exterior gets treated.
Remove with a spider or slotted spoon, allow the excess water to drain, and return the bun to your lined baking sheet seam-side down.
After the bath, an egg wash adds even more shine and encourages that gorgeous deep brown color.
How to Get Those Perfect X’s on Top
This is one of those tiny details that makes a big difference in how the finished buns look.
After the baking soda bath and egg wash, use a very sharp knife or bread lame to score a shallow X into the top of each bun.
The key word is shallow.
You want to cut through the surface of the dough without slicing deeply enough to expose the filling. About ¼ inch deepis plenty.
As the buns expand in the oven, those cuts open up and create the lighter X against the dark pretzel crust.
Finish with coarse pretzel salt and they’re ready to bake.
Common Mistakes to Avoid
Adding too much flour. The dough should be soft and slightly tacky. Adding flour until it feels completely dry can leave you with denser pretzel buns.
Stuffing the buns with hot sausage. Let the cooked filling cool before assembling so you don’t warm the dough and interfere with shaping and proofing.
Overfilling. I know it’s tempting, but you need enough dough around the filling to create a strong seal.
Not sealing the bottoms completely. Pinch those seams well. This is your best defense against cheese escaping.
Skipping the second rise. The shaped buns need time to puff before their baking soda bath.
Boiling them too long. These only need a quick 20–30 second bath. Longer isn’t necessarily better.
Scoring too deeply. You’re creating a surface cut, not slicing into the center of the bun.
Underbaking based on color fear. Pretzels are supposed to get deeply browned. That dark golden-brown exterior is part of what makes them look and taste like pretzels.
Frequently Asked Questions
Do I have to use a stand mixer?
No. A stand mixer makes kneading easier, but you can knead the dough by hand. It will simply take a little more time and effort to develop a smooth, elastic dough.
Can I use instant yeast instead of active dry yeast?
Yes. If using active dry yeast, let it sit in the warm milk and brown sugar for about 5–10 minutes before continuing. Instant yeast can generally be mixed in without that waiting period.
How warm should the milk be?
Aim for approximately 105–110°F. It should feel comfortably warm, not hot. Milk that is excessively hot can damage the yeast.
Can I use a different sausage?
Yes. I like mild Italian sausage here because it complements the cheddar and sage without overpowering them, but another savory sausage can work.
What kind of cheddar should I use?
Use a good sharp cheddar, preferably freshly grated from a block. The stronger flavor holds up well against the sausage and pretzel dough.
Can I leave out the sage?
Yes. The buns will still be delicious with sausage and cheddar alone. The sage is what gives this version an extra savory, fall-inspired flavor.
Why do pretzels need a baking soda bath?
The alkaline bath changes the surface of the dough, encouraging the characteristic deep browning, pretzel flavor, and slightly chewy exterior during baking.
Can I use regular salt on top?
Coarse pretzel salt is ideal because it gives you those distinct salty bites and the classic appearance. If substituting, use another coarse salt rather than fine table salt.
How do I know when they’re finished baking?
They should be deep golden brown, not pale. The scored areas will remain lighter, creating that classic contrast on top.
How to Store Sage Sausage & Sharp Cheddar Stuffed Pretzel Buns
Because these contain cooked sausage and cheese, store leftover buns in an airtight container in the refrigerator for up to 3–4 days.
They’re at their best warm, so I recommend reheating rather than eating them straight from the refrigerator.
For the best texture, reheat them in a 325–350°F oven until warmed through. This helps revive the pretzel exterior without making the bread tough.
A microwave works when you’re in a hurry, although the exterior will be softer.
Make Ahead
You can make the sausage filling ahead of time and refrigerate it until you’re ready to assemble the buns. Just let it lose some of its refrigerator chill before stuffing so you aren’t wrapping the dough around an extremely cold filling.
If you’re serving these for a party or game day, my preference would be to bake them the same day and serve them slightly warm.
You can also bake them earlier in the day and gently rewarm them in the oven shortly before serving.
More recipes to try…

Sage Sausage & Sharp Cheddar Stuffed Pretzel Buns
Equipment
- Stand mixer fitted with dough hook
- Large Mixing Bowl
- Skillet
- Large Pot
- Spider or slotted spoon
- large baking sheet
- Pastry Brush
- Sharp knife or bread lame
Ingredients
Pretzel Dough
- 1 cup whole milk warmed to 105–110°F
- 1 tbsp light brown sugar
- 2 1/4 tsp active dry or instant yeast
- 4 tbsp unsalted butter melted and slightly cooled
- 3 cups all-purpose flour
- 1 tsp kosher salt
Sausage & Cheddar Filling
- 1 lbs mild Italian sausage
- 1 tbsp finely chopped fresh sage
- 4 oz sharp cheddar cheese grated
Baking Soda Bath
- 8 cups water
- 1/2 cup baking soda
For Finishing
- 1 large egg
- 1 tbsp water
- Coarse pretzel salt

Instructions
Make the Filling
- Add the sausage to a skillet over medium heat and cook, breaking it into small crumbles, until completely cooked through.
- During the final 1–2 minutes of cooking, stir in the finely chopped fresh sage and cook just until fragrant.
- Transfer the sausage mixture to a plate or bowl and allow it to cool completely before filling the dough.
Make the Pretzel Dough
- Add the warm milk and brown sugar to the bowl of a stand mixer. Sprinkle the yeast over the top. If using active dry yeast, allow it to sit for 5–10 minutes until slightly foamy. If using instant yeast, you can proceed without waiting.
- Add the melted butter, flour, and kosher salt.
- Mix with the dough hook on low speed for 1–2 minutes, until a shaggy dough forms.
- Increase to medium-low speed and knead for about 5–7 minutes, until the dough is smooth and elastic. It should feel soft and slightly tacky but should not be excessively sticky.
First Rise
- Shape the dough into a ball and place it in a lightly greased bowl. Cover and let rise in a warm spot for about 1 hour, or until roughly doubled in size.
Fill & Shape
- Gently punch down the risen dough and turn it onto a clean work surface.
- Divide the dough into 8 equal portions.
- Flatten one portion into approximately a 4½–5-inch round.
- Add a portion of the cooled sausage filling and grated sharp cheddar to the center. Avoid overfilling so you have enough dough around the edges to create a strong seal.
- Bring the edges of the dough up and around the filling and firmly pinch the seam completely closed.
- Place the bun seam-side down and gently shape it into a round.
- Repeat with the remaining dough and filling.
Second Rise
- Arrange the filled buns on a parchment-lined baking sheet, leaving space between each one.
- Cover loosely and let rise for 20–30 minutes, until slightly puffed.
- Meanwhile, preheat the oven to 425°F.
Prepare the Baking Soda Bath
- Bring 8 cups water to a boil in a large pot.
- Carefully and gradually add the ½ cup baking soda. The mixture will foam, so avoid adding it all at once.
- Reduce the heat slightly to maintain a gentle boil.
- Working with 1–2 buns at a time, carefully lower them into the baking soda bath for 20–30 seconds total, gently turning halfway through if needed.
- Remove with a spider or slotted spoon and allow the excess water to drain.
- Return each bun to the parchment-lined baking sheet seam-side down.
Finish & Bake
- Whisk together the egg and 1 tablespoon water.
- Brush each bun thoroughly with the egg wash.
- Using a sharp knife or bread lame, score a shallow X about ¼ inch deep into the top of each bun. You only want to cut through the surface, not deeply enough to expose the filling.
- Sprinkle generously with coarse pretzel salt.
- Bake at 425°F for 15–18 minutes, until deeply golden brown.
- Allow the buns to cool for 10–15 minutes before serving. They’re best enjoyed warm.
Notes
Keep your scoring shallow: About ¼ inch is plenty. You want to break through the pretzel skin without cutting into the filling. Let them get dark: Don’t pull them because you’re worried they look too brown. That deep golden-brown exterior is part of the signature pretzel crust. Storage: Refrigerate leftovers in an airtight container for up to 3–4 days. Reheat at 325–350°F until warmed through for the best texture.
Nutrition
Key Takeaways
- Sage Sausage and Sharp Cheddar Stuffed Pretzel Buns feature a soft pretzel crust, cheesy filling, and a chewy texture.
- The dough is approachable, needing a quick baking soda bath for that classic pretzel flavor and crust.
- These buns are perfect for sharing, making them great for parties and gatherings, or enjoyed warm at home.
- Avoid common mistakes, like overfilling and skipping the second rise, to ensure perfect buns.
- Store leftovers in the refrigerator and reheat for the best texture, ideally in the oven.


Leave a Comment