
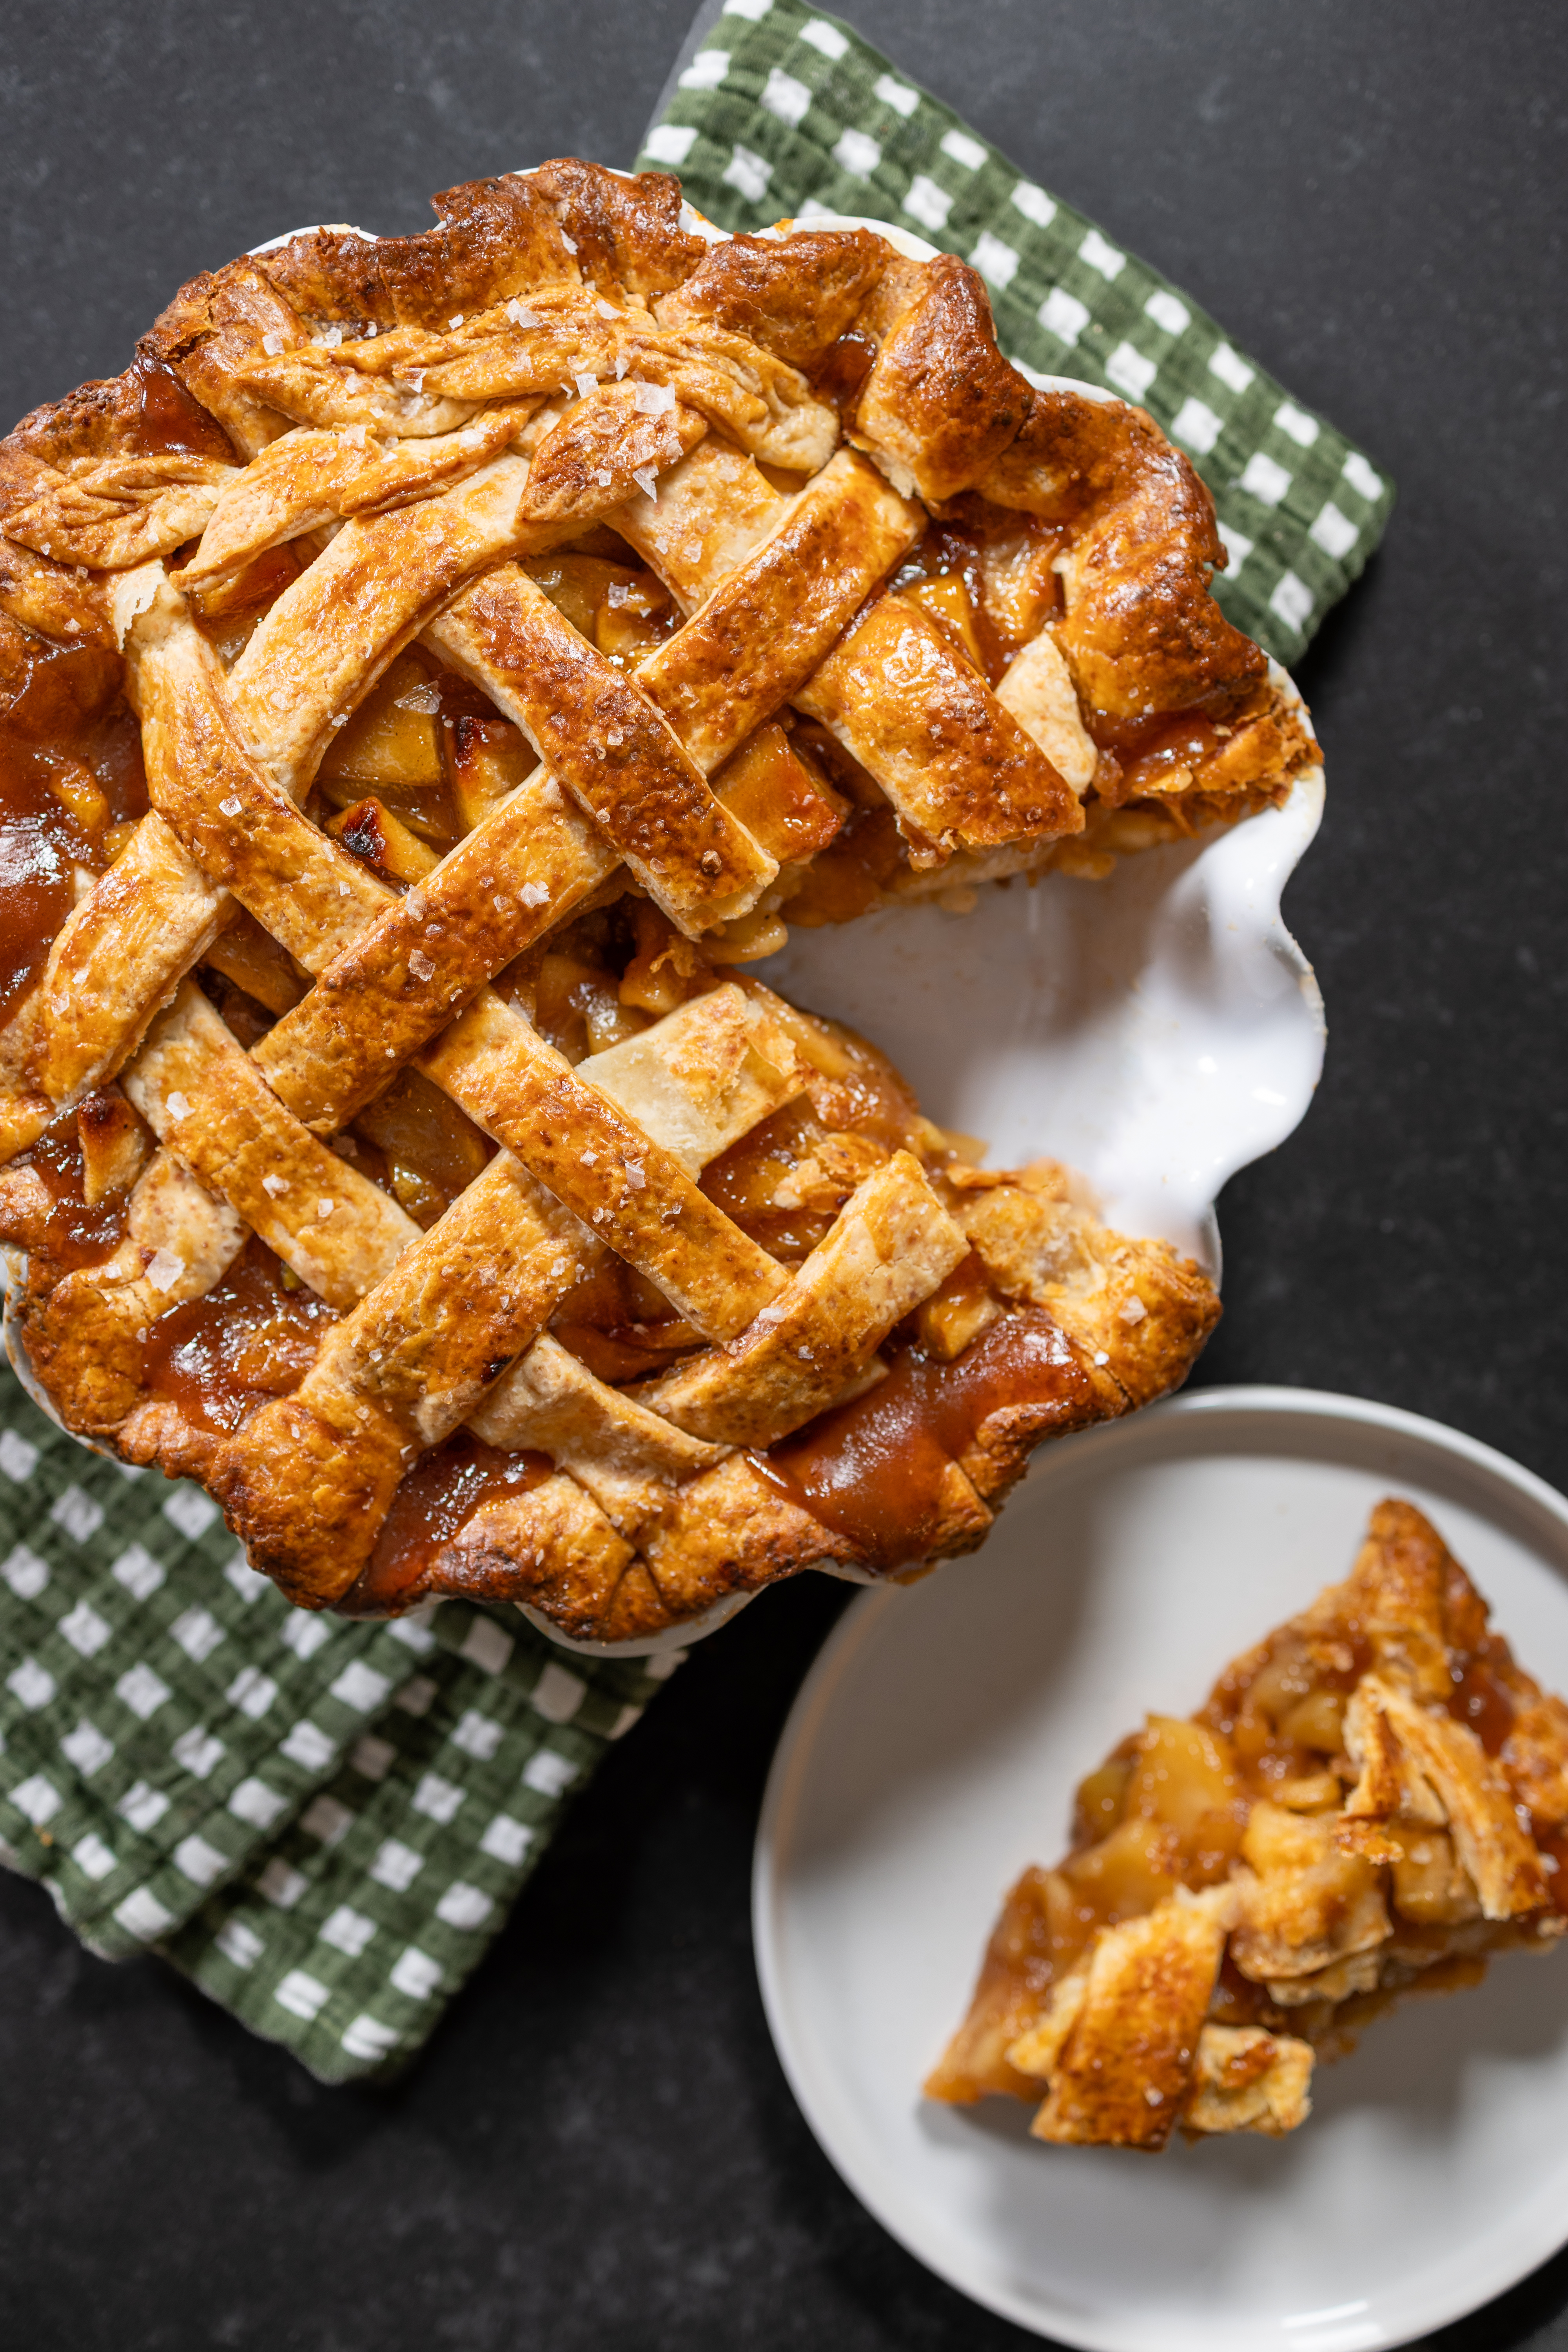
This Salted Apple Cider Pie takes everything I love about a classic apple pie and turns the flavor all the way up. A mix of Granny Smith and Honeycrisp apples is cooked with a deeply concentrated apple cider reduction, tucked inside an extra-flaky cheddar pastry, and finished with flaky salt.
And before the cheddar crust scares you, trust me on this one.
The finished pie doesn’t taste overwhelmingly cheesy. You get crisp, buttery pastry first, followed by tender apples and this deep, concentrated apple cider flavor. Then the cheddar comes through as a subtle savory note before the flaky salt hits at the end. It’s sweet, tart, buttery, salty and savory all at once, without any one flavor overpowering the others.
Even my boyfriend who claims to not like pie or cooked fruit gave this one a 10/10. So take that as you will…

Why You’ll Love This Apple Pie
There are a few things happening here that make this different from a traditional apple pie.
First, instead of simply adding apple cider to the filling, we’re reducing it into a thick, intensely flavored syrup. You get significantly more cider flavor without adding a ton of extra liquid to the pie.
We’re also using both Granny Smith and Honeycrisp apples. Granny Smith gives us tartness and structure while Honeycrisp brings sweetness and that classic fresh apple flavor.
And then there’s the cheddar pastry. Sharp cheddar is incorporated directly into the pie dough, where it adds a subtle savory flavor and makes the crust unbelievably good against the sweet filling.
Finally, flaky salt brings everything together. Don’t skip it!
Table of contents
A Note About the Cheddar Crust
Don’t Be Scared of the Cheddar Crust
I completely understand why putting cheddar cheese into an apple pie might make you hesitate.
Here’s what I want you to know: this does not taste like a cheesy apple pie.
I used Tillamook Sharp Cheddar Cheese from a block, grated finely and incorporated directly into the pie dough.
Once baked, the cheddar becomes surprisingly subtle. The best way I can describe what it does is that crisp, savory edge you get from a really good cheddar breadstick. You still taste buttery, flaky pie crust first, but there’s this underlying savory quality that works so well against the sweet, concentrated cider filling.
Grating the cheese finely is important. You want it distributed throughout the pastry rather than leaving large pockets of cheese in the dough.
If the cheddar is the part of this recipe making you nervous, trust me on this one.
Why Reduce the Apple Cider?
This is probably the most important step that makes this pie taste different.
We’re starting with several cups of apple cider and slowly reducing it until only about 3/4 cup remains.
As water evaporates, all of that apple flavor becomes concentrated. Instead of adding cups of liquid to our filling, we get a thick, intensely apple-y cider reduction.
What should the cider reduction look like?
Don’t rely exclusively on the clock here.
As the cider reduces, the bubbles will begin to look thicker and glossier and the cider will take on a darker color. Toward the end, keep a close eye on it because the volume can decrease surprisingly quickly.
You’re looking for 3/4 cup of concentrated cider.
The easiest and most reliable way to know when you’re there is to occasionally pour the reduction into a heat-safe measuring cup as you get close. If you have more than 3/4 cup, return it to the pan and continue reducing.
Do not keep cooking it once you’ve reached 3/4 cup. We want concentrated cider, not hard apple candy.
Choosing the Apples
For this recipe, you’ll need:
4 Granny Smith apples + 4 Honeycrisp apples
Using two varieties gives the filling more dimension than using just one.
Granny Smith apples are tart and hold their shape well during cooking. Honeycrisp apples are sweeter and bring a more rounded apple flavor.
Peel and core the apples, then slice them approximately 1/4-inch thick.
Here’s one tiny step I don’t want you to skip: cut the apple slices in half crosswise.
Long apple crescents can pull out of a slice of pie when you take a bite. Shortening the slices makes the finished pie much easier to cut and eat, and helps the filling stay neatly inside each slice.

Why We’re Precooking the Apple Filling
Precooking gives us much more control over the final texture of the pie.
Instead of hoping raw apples soften at exactly the same rate that the crust browns, we’re giving them a head start on the stove.
It also allows the apples to release some of their moisture before they go into the pastry.
The goal is not to cook the apples until they’re completely soft. They should begin to soften but still have structure when the filling goes into the crust. They’ll finish cooking in the oven.

Common Mistakes to Avoid
Not reducing the cider enough.
Six cups sounds like a lot because it is! Keep going until you have exactly 3/4 cup. Stopping too early means adding unnecessary liquid to the filling and missing the intensely concentrated cider flavor that makes this pie special.
Cooking the apples until they’re completely soft.
You’re only giving them a head start on the stove. They should begin to soften but still have structure when you remove them from the heat because they have a long bake ahead of them.
Adding hot filling to cold pie dough.
Let the filling cool before assembling the pie. Hot filling can begin melting the butter in your pastry before it reaches the oven, working against all of those flaky layers.
Adding too much water to the dough.
Your pie dough doesn’t need to look perfectly smooth. Stop adding ice water as soon as it holds together when squeezed. A slightly shaggy dough is exactly what you’re looking for.
Trying to fix warm dough with more flour.
If the dough becomes sticky, soft or greasy while you’re working with it, it probably needs to get cold again. Refrigerate it for 10–15 minutes instead of continuing to add flour.
Taking the pie out when the crust looks done.
A deeply golden crust is only one indicator. Look through the lattice for filling that is actively bubbling. If the crust gets dark before the filling is bubbling, protect the browned areas with foil and continue baking.
Cutting into the pie while it’s still hot.
The filling continues to set as the pie cools. Give it at least 3–4 hours before slicing for clean wedges that actually hold together.
Skipping the flaky salt.
I’m putting this on the mistake list because it makes that much of a difference. The salt brings out the concentrated cider flavor while balancing the sweetness and savory cheddar crust.
FAQs
How Do I Know My Pie Dough Has Enough Water?
This is one of the most common places people get nervous about homemade pie crust.
Your dough does not need to look like a smooth ball while it’s still in the bowl.
Grab a handful and squeeze it.
If it holds together, you’re probably there.
If it immediately crumbles apart and there are large areas of completely dry flour, add another small splash of ice water and test again.
Adding too much water can make pie crust tougher and can encourage gluten development, so go slowly.
What If My Pie Dough Gets Too Warm?
Put it in the refrigerator.
Seriously, that’s the fix.
Cold butter is one of the keys to flaky pastry. If the dough becomes sticky, very soft, or greasy while you’re rolling or assembling it, don’t fight with it and keep adding flour.
Refrigerate it for 10–15 minutes and come back.
Can I Make the Pie Dough Ahead?
Yes.
The cheddar pie dough can be prepared in advance, wrapped tightly, and refrigerated overnight.
This is actually how I made mine during testing.
You can also make the cider reduction ahead of time and refrigerate it in an airtight container.
Can I use apple juice instead of apple cider?
I recommend using apple cider. Apple cider has a deeper, more complex apple flavor that becomes even more pronounced when reduced. Apple juice is generally sweeter and lighter in flavor, so you won’t get quite the same result.
Can I Use Only One Type of Apple?
Technically, yes, but I recommend the Granny Smith and Honeycrisp combination.
The two varieties are doing different jobs. Granny Smith provides tartness and structure while Honeycrisp adds sweetness and apple flavor.
Using both gives the finished filling a more balanced flavor and texture.
Can I Skip the Cheddar?
You can make an apple pie without cheddar, but then you’re changing one of the defining elements of this particular recipe.
The cheddar flavor in the baked pastry is much subtler than you may expect. If you’re hesitant about it, I’d encourage you to make the recipe as written at least once.
Does the Pie Taste Like Cheese?
No.
You can taste the savory depth in the pastry, but this isn’t a cheese-forward dessert. The dominant flavors are still apple, cider, buttery pastry, warm spice, and salt.
Why Did My Cider Take Longer to Reduce?
That’s completely normal.
Reduction time can change based on the width of your pan, starting quantity, stove, heat level, and water content of your cider.
That’s why volume is a better indicator than time for this recipe.
Your goal is 3/4 cup.
How Do I Know When My Apple Filling Is Ready?
Look at both the apples and the liquid.
The apples should have begun to soften but should not be completely tender. The liquid around them should look glossy and thick enough to coat the fruit rather than looking watery.
Remember that both will continue cooking in the oven.
How Do I Know When the Pie Is Done?
Look for two things:
- A deeply golden-brown crust.
- Filling that is visibly bubbling through the vents.
The bubbling is especially important because the filling needs to reach a sufficient temperature for the cornstarch to do its job.
If your crust is browning before the filling is bubbling, protect the crust with foil and continue baking.
Why Do I Have to Wait Before Cutting It?
Because hot pie filling is still fluid.
As the pie cools, the thickened filling sets around the apples. Giving it several hours to cool is one of the reasons you can cut a clean wedge rather than having the filling immediately spill onto the plate.
More fall favorites to try!
Planning ahead: This pie takes several hours from start to finish, but don’t let the total time scare you. A large portion of that is hands-off chilling, baking and cooling time.
To make things easier, you can prepare the cheddar pie dough and reduce the apple cider the day before. Then you’ll be ready to make the filling, assemble and bake the pie the next day.

Salted Apple Cider Pie with Cheddar Pastry
Equipment
- 9 inch pie dish
- Large Mixing Bowl
- pastry cutter optional
- Large saucepan or wide pot
- Large skillet or pot for the filling
- Heat-safe liquid measuring cup
- Apple peeler or vegetable peeler
- Apple corer or paring knife
- Pastry Brush
- Metal sheet pan
- Wire cooling rack
- Aluminum foil
Ingredients
Cheddar Pie Crust
- 2 1/2 cups all-purpose flour
- 1 tablespoon granulated sugar
- 1 teaspoon kosher salt
- 4 ounces Tillamook Sharp Cheddar Cheese freshly and finely grated from a block
- 1 cup cold unsalted butter cut into cubes
- 1/3 cup ice water as needed
Apple Cider Reduction
- 6 cups apple cider
Apple Filling
- 4 Granny Smith apples
- 4 Honeycrisp apples
- 1/2 cup granulated sugar
- 1/3 cup packed brown sugar
- 1 1/2 teaspoons ground cinnamon
- 1/4 teaspoon ground nutmeg
- 3/4 teaspoon kosher salt
- 2 tablespoons fresh lemon juice
- 3 tablespoons cornstarch
- 3/4 cup prepared apple cider reduction
- 2 tablespoons unsalted butter
- 1 teaspoon vanilla extract
For Assembly
- 1 large egg beaten with 1 tablespoon water
- Coarse sugar for sprinkling
- Flaky salt for finishing

Instructions
Make the Cheddar Pie Dough
- Combine the dry ingredients.In a large bowl, whisk together the flour, granulated sugar and kosher salt. Finely grate the sharp cheddar directly into the mixture and toss until evenly distributed. Grating the cheese finely helps it disperse throughout the dough rather than leaving large pockets of cheese in the finished pastry.
- Cut in the butter. Add the cold cubed butter. Using a pastry cutter or your fingertips, work the butter into the flour mixture until you have a combination of smaller pieces and larger flat pieces of butter.
- Don’t try to make the mixture completely uniform. Those larger visible pieces of cold butter are going to help create flaky layers.
- Add the ice water. Add 1/3 cup ice water a little at a time, gently tossing the mixture with a fork after each addition.
- Squeeze a handful of dough in your palm. If it holds together, stop adding water. If it immediately falls apart and you still have lots of completely dry flour, add more ice water 1 tablespoon at a time. (You may not need the full 1/2 cup.)
- The dough should look shaggy rather than wet or completely smooth.
- Fold the dough. Turn the dough onto a lightly floured work surface and gently bring it together.
- Press it into a rough rectangle. Fold one third toward the center, then fold the opposite third over it like you’re folding a letter.
- Rotate the dough 90 degrees, gently flatten it back into a rectangle and repeat the fold once more. Don't knead the dough!
- Divide and chill. Divide the dough approximately 55/45, leaving the slightly larger portion for the bottom crust.
- Shape each portion into a disk, wrap tightly and refrigerate for at least 1 hour. (The dough can also be made the day before and refrigerated overnight.)
Make the Apple Cider Reduction
- Reduce the cider. Pour 6 cups apple cider into a wide saucepan or pot.
- Bring it to a boil, then reduce the heat enough to maintain a steady simmer.
- Continue cooking until the cider has reduced all the way to 3/4 cup.
- As it reduces, the cider will become darker and increasingly syrupy. Keep a particularly close eye on it toward the end because the volume can decrease quickly.
- Don’t rely solely on time. Carefully measure the cider as you get close. If you have more than 3/4 cup, return it to the pan and continue reducing.
- Once you have exactly 3/4 cup, remove it from the heat.
Prepare the Apple Filling
- Prep the apples. Peel and core all 8 apples.
- Slice them approximately 1/4-inch thick, then cut the slices in half crosswise to create shorter pieces.
- Begin cooking the filling. Place the prepared apples in a large skillet or pot with the granulated sugar, brown sugar, cinnamon, nutmeg, kosher salt and lemon juice.
- Cook over medium heat, stirring gently, for approximately 6–8 minutes, until the apples have started to soften and release some of their juices but still have plenty of structure.
- Add the cider and thicken. Add the full 3/4 cup apple cider reduction and sprinkle the cornstarch evenly over the apples while stirring.
- Continue cooking for another 1–3 minutes, stirring gently, until the liquid becomes glossy and noticeably thickens enough to coat the apples.
- The apples should not be completely soft. Remember, they’re going to continue cooking for more than an hour in the oven.
- Finish the filling. Remove from the heat and stir in the butter and vanilla.
- Set the filling aside and allow it to cool before assembling the pie.
Assemble the Pie
- Preheat the oven. Place a metal sheet pan in the oven and preheat to 425°F.
- Heating the sheet pan along with the oven gives the bottom of the pie an immediate blast of heat and helps the bottom crust bake through.
- Roll the bottom crust. Lightly flour your work surface and rolling pin.
- Roll the larger disk of chilled dough into a circle approximately 12 inches across, or large enough to fit your 9-inch pie dish with some overhang.
- Rotate the dough periodically while rolling to make sure it isn’t sticking.
- Gently transfer the dough to your pie dish. Let it fall naturally into the corners rather than stretching it to fit.
- Add the filling. Spoon the cooled apple filling into the crust, including all of that thickened cider mixture.
- Spread the apples into an even layer.
- Add the top crust. Roll out the second disk of dough and carefully place it over the apples.
- Trim the excess pastry, leaving enough to seal the two crusts together.
- Press the edges together and crimp as desired.
- Cut several vents in the center of the top crust so steam can escape.
- Chill again. Place the assembled pie in the refrigerator for 20–30 minutes.
- Don’t skip this final chill. It firms the butter back up after rolling and assembling the pastry.
Bake
- Add the egg wash. Beat 1 egg with 1 tablespoon water. Brush a thin, even layer over the top crust. Sprinkle with coarse sugar.
- Start at 425°F. Carefully place the pie onto the preheated metal sheet pan.
- Bake at 425°F for 20 minutes.
- Lower the temperature. Without removing the pie from the oven, reduce the oven temperature to 375°F.
- Continue baking for approximately 45–60 minutes, until the crust is deeply golden brown and the apple filling is visibly bubbling through the vents.
- If the outer crust is browning too quickly, loosely cover the edges with aluminum foil while allowing the center to continue baking.
- Don’t remove the pie based on crust color alone. You want to see the filling bubbling. That’s an important sign that the filling has gotten hot enough for the cornstarch to fully thicken.
Cool and Finish
- Cool completely. Transfer the pie to a wire rack and let it cool at room temperature for at least 3–4 hours before slicing.
- This cooling period is part of the recipe. The filling continues to thicken and set as its temperature comes down.
- During my test, I let the pie cool for approximately 3 hours and 20 minutes in a 67°F kitchen, and it sliced beautifully.
- Finish with flaky salt. Just before serving, sprinkle the top with flaky salt.
- Slice and serve as-is or with vanilla ice cream.
Notes
How I Decorated the Pie
I finished this pie with a lattice crust and used the remaining scraps of cheddar pie dough to cut out small decorative leaves. This part is completely optional, so don’t let the design stop you from making the recipe. You can create a simple lattice, cover the filling with a full top crust and cut vents into it, or decorate it however you’d like. If you do add decorative pieces, keep the dough cold while you’re working. If it starts becoming too soft to cut cleanly, refrigerate it for 10–15 minutes before continuing. Cooling: Don’t rush the cooling period. Cutting a fruit pie while it’s very hot can make even a properly thickened filling appear runny.Nutrition
My Biggest Tips Before You Start
Make the dough ahead if you can. Splitting the recipe over two days makes the whole process feel much easier.
Don’t rush the cider. Reducing 6 cups all the way to 3/4 cup is what creates that concentrated cider flavor.
Use the visual cues in this recipe. “6–8 minutes” matters less than seeing apples that have started to soften but still have structure.
Keep the pastry cold. The refrigerator is your friend.
Cool the filling before assembly. Hot filling and cold butter-based pastry are not a good combination.
Bake until the filling bubbles. A beautiful crust doesn’t necessarily mean the center is finished.
Let it cool before slicing. You worked too hard on this pie to cut it open immediately and watch hot filling run everywhere.
And do not skip the flaky salt. I mean it.
The Bite That Sold Me
The thing I love most about this pie is that none of the individual twists feel gimmicky once you actually taste them.
You get the crisp, flaky pastry first, then this incredibly concentrated apple cider flavor, tart and sweet apples, just enough warm spice, a subtle savory note from the cheddar and finally little hits of salt.
The cheddar doesn’t overpower the apples. The cider doesn’t make the filling wet. And the flaky salt isn’t just decoration.
Everything has a job.
I went into the first test expecting to take notes on what I’d change for round two. Instead, I took one bite and realized there wasn’t going to be a round two.
This is the pie.


Leave a Comment