
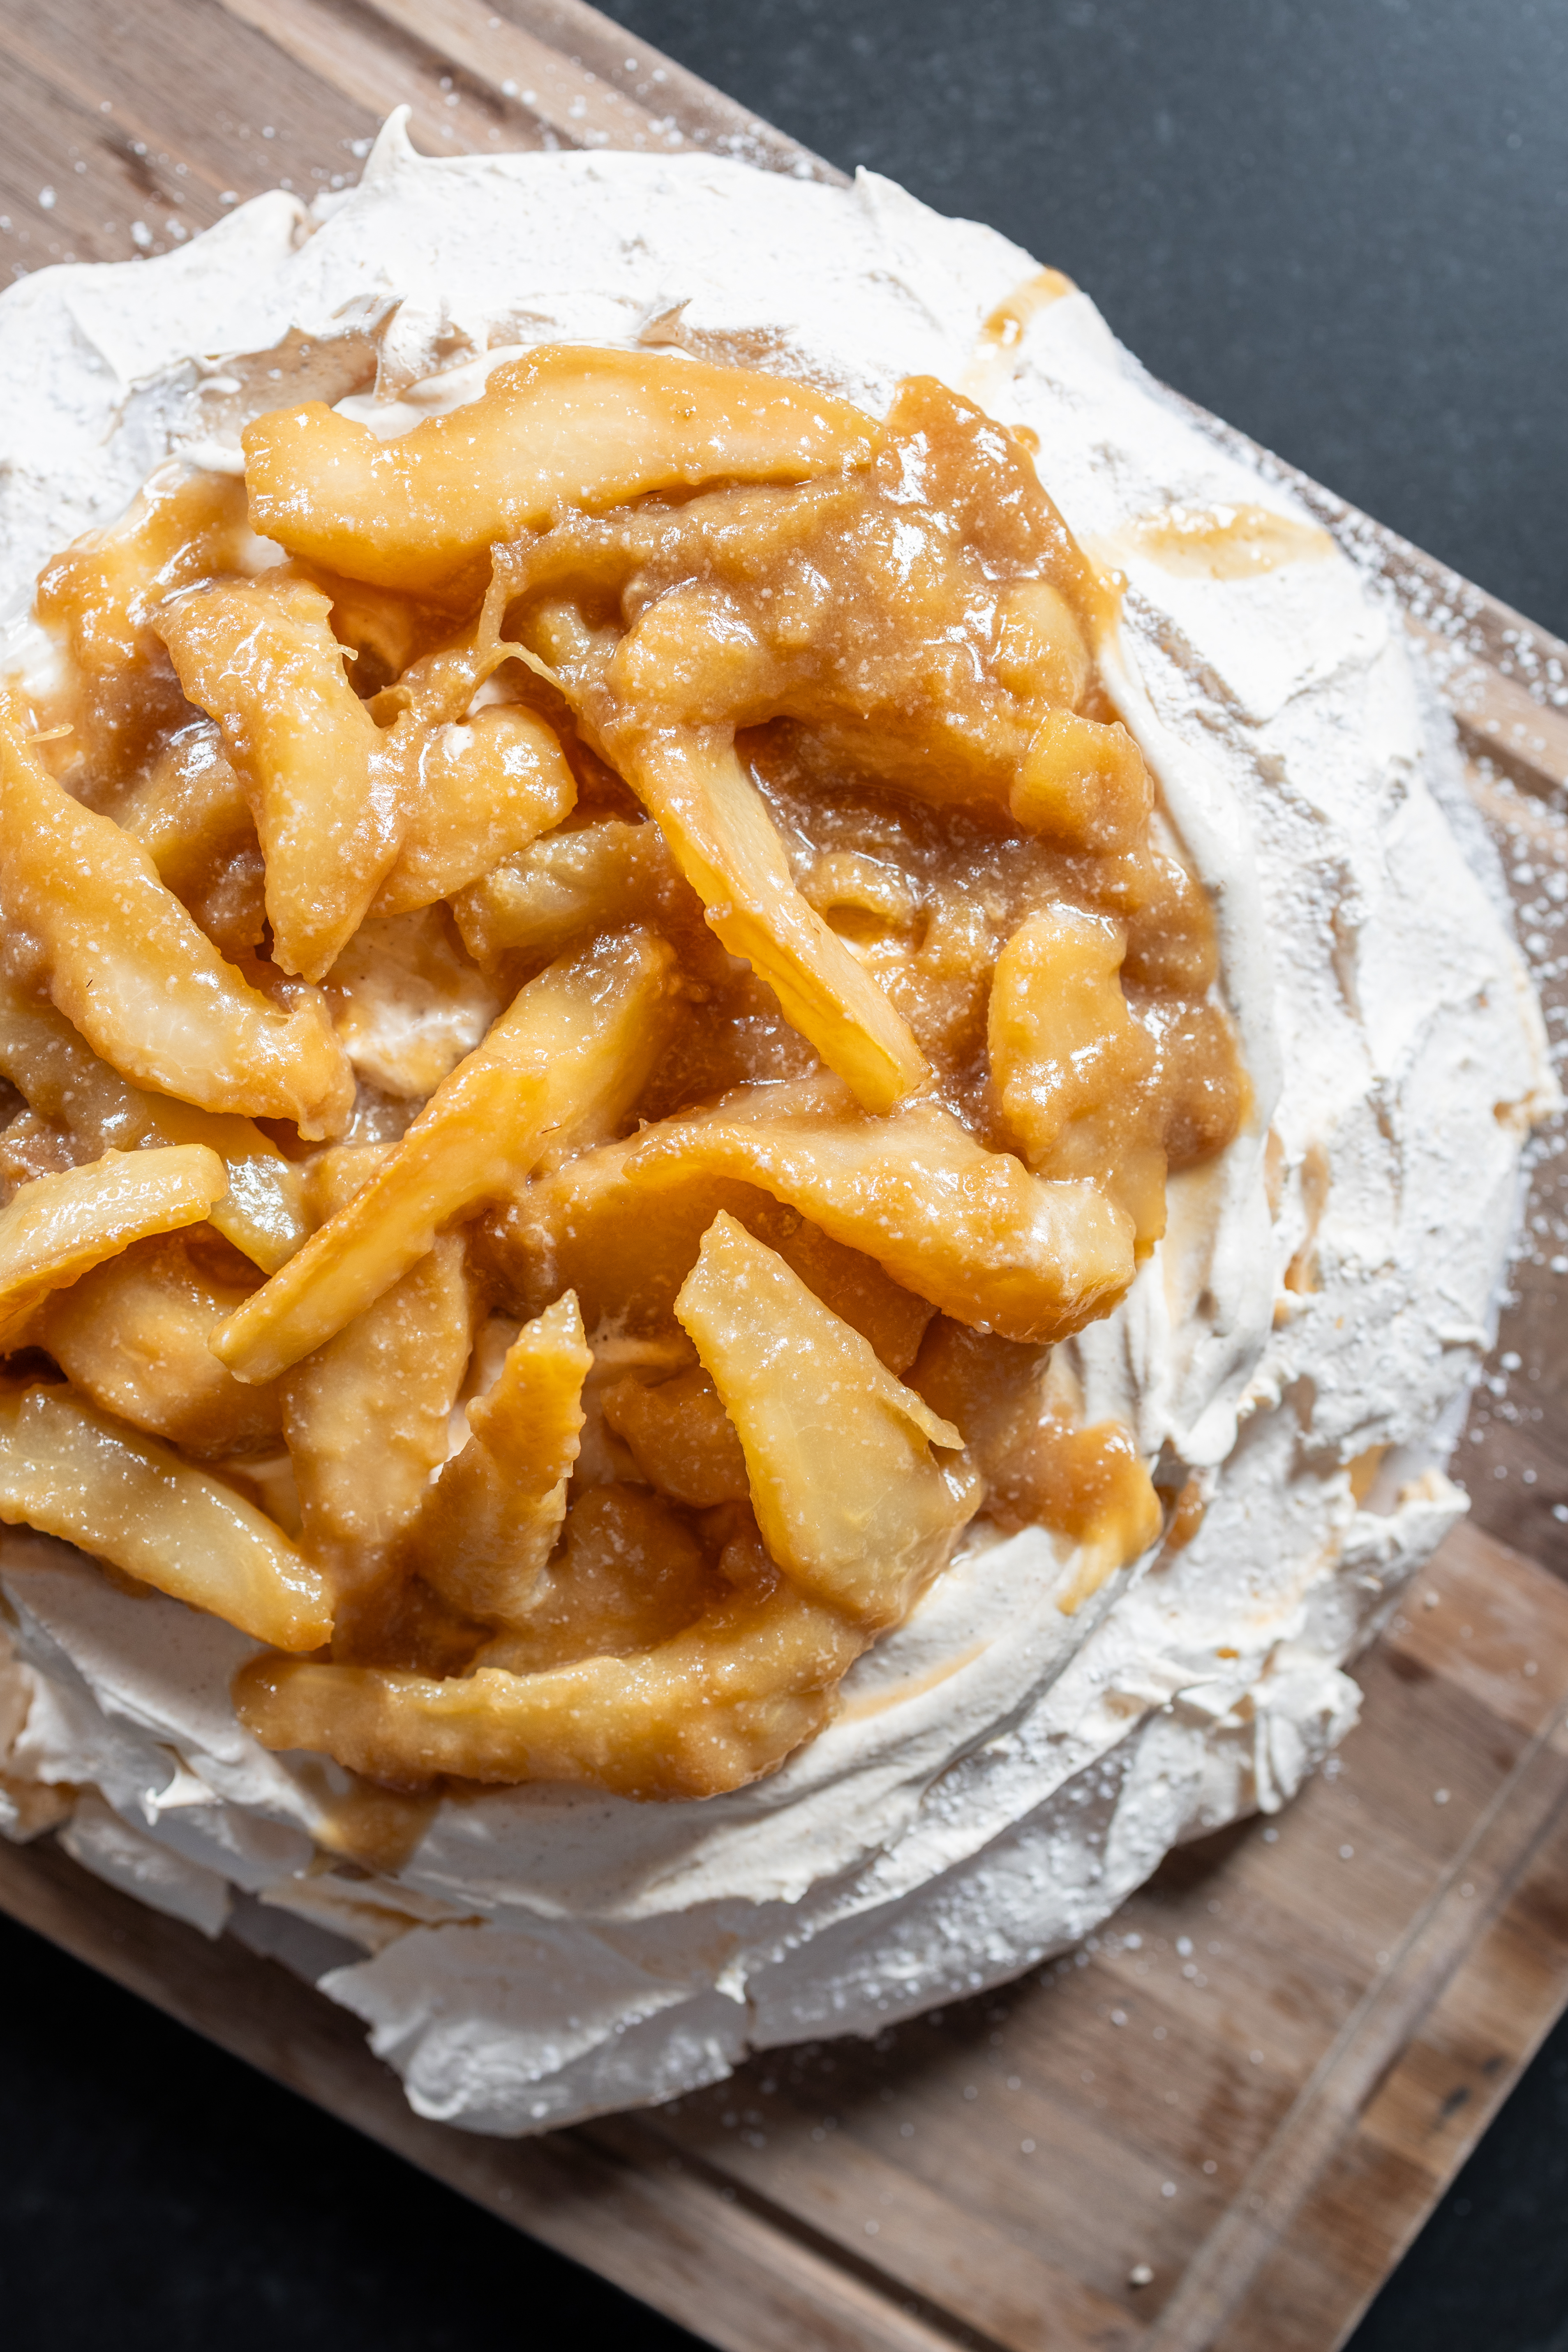
Pavlova has been on my list to make for a while, but I knew if I was going to include one in this year’s fall baking series, I didn’t want to just put fall fruit on top and call it a day.
This one ended up being everything I wanted it to be. The pavlova has that delicate, crisp shell that cracks when you cut into it, but the center stays incredibly soft and marshmallowy. Then there’s a thick layer of chai mascarpone cream made with actual chai tea and warm spices, topped with buttery caramelized pears.
And when I tell you the textures are just as good as the flavors, I mean it. You get crisp, marshmallowy, creamy, and caramelized all in one bite.
If you’ve never made pavlova before, don’t let it intimidate you. There are a few steps where technique matters, but I’m walking you through exactly what to look for along the way. A few cracks are not only okay, they’re expected.

Table of contents
Why You’ll Love This Recipe
It’s an unexpected fall dessert. Pear and chai give this pavlova such a distinct fall flavor without relying on pumpkin, apple, or a ton of cinnamon.
The textures are incredible. The outside of the pavlova is crisp and delicate while the inside stays soft and marshmallowy. Add silky mascarpone cream and tender caramelized pears, and every layer brings something different.
The chai actually tastes like chai. We’re steeping three chai tea bags directly into the cream to get that black tea flavor, then adding just enough cinnamon, cardamom, ginger, and clove to bring the spices forward.
It looks much harder than it is. Pavlova is a showstopper, but there aren’t any complicated decorating techniques involved. The cracks and swoops are part of what makes it beautiful.
You can break up the work. Several components can be prepared ahead, so you don’t have to make the entire dessert at once.
Before You Make Your Pavlova
Pavlova isn’t difficult, but it is a recipe where the little details matter. If this is your first time working with meringue, these are the things I want you to know before you start.
Your mixing bowl and whisk need to be completely clean and free of grease. Even a small amount of fat or egg yolk can prevent egg whites from whipping properly.
Room-temperature egg whites generally whip more easily and to greater volume than very cold whites. If you find eggs easier to separate while cold, separate them first and then let the whites come to room temperature.
Most importantly, don’t rush the sugar. Adding it gradually gives the sugar time to dissolve into the egg whites. By the time your meringue is finished, it should be thick and glossy, hold a stiff peak, and feel almost completely smooth when rubbed between two fingers.
Those visual and tactile cues matter more than simply watching the clock.

Common Mistakes to Avoid
Adding the sugar too quickly
Dumping the sugar into the egg whites all at once can leave you with a grainy, unstable meringue. Add it approximately one tablespoon at a time, giving each addition a chance to incorporate before adding the next.
Stopping as soon as you reach stiff peaks
Stiff peaks are important, but also check the sugar. Rub a little meringue between your thumb and finger. If you can still feel obvious sugar crystals, continue whipping and check again.
Spreading the meringue too thin
We’re making one large pavlova with a marshmallowy center, not a thin meringue disk. Keep the meringue within your 8-inch guide and build it upward to roughly 2½ to 3 inches tall.
Opening the oven while it cools
Once the baking time is finished, turn the oven off and leave the door closed. That slow cooling period helps the pavlova set and minimizes sudden temperature changes.
Assuming cracks mean you failed
They don’t. Pavlova is delicate and some cracking is completely normal. Mine cracked too, and the inside was exactly the consistency I wanted.
Adding warm pears
Let the caramelized pears cool completely before assembly. Warm pears can loosen the mascarpone cream and accelerate how quickly the meringue softens.
Over-whipping the mascarpone cream
Once mascarpone cream becomes thick enough to hold its shape, stop. Over-whipping can take a silky cream into a grainy or separated texture surprisingly quickly.
How Do I Know When My Pavlova Is Done?
The exterior should feel dry and crisp rather than sticky, and it should be very pale with perhaps a little subtle coloring.
Don’t use the inside of the pavlova as your doneness test. The center is supposed to remain soft and marshmallowy. We’re not trying to dry the entire thing into a crunchy meringue cookie.
After 1 hour and 20 minutes of baking, turn off the oven and leave the pavlova inside with the door closed for at least 2 hours. That cooling time is part of the recipe, not an optional waiting period.
Frequently Asked Questions
What is the difference between pavlova and meringue?
Pavlova is made from a meringue base, but the desired texture is different from a completely dried meringue cookie. Pavlova should have a delicate crisp shell surrounding a soft, fluffy, marshmallow-like center.
Why did my pavlova crack?
Some cracking is completely normal. The crisp exterior is extremely delicate, especially on a tall pavlova like this one. Don’t try to hide every crack. Once you add the cream and pears, they become part of the finished look.
Why is cornstarch added to pavlova?
Cornstarch helps contribute to the characteristic soft, marshmallow-like center rather than allowing the entire meringue to dry out and become crisp.
Why are we using cream of tartar?
Cream of tartar provides acidity that helps stabilize the whipped egg whites. For this recipe, I prefer it to adding a liquid acid such as vinegar.
Can I use granulated sugar instead of superfine sugar?
Yes. Pulse regular granulated sugar briefly in a food processor or blender to make the crystals finer. You aren’t trying to make powdered sugar, so stop while the sugar is still visibly granulated.
Do I have to use Bosc pears?
Bosc pears are my first choice because they hold their shape well when cooked. Another firm pear can work, but avoid extremely ripe, soft pears because they’ll be more likely to break down in the skillet.
Can I skip the mascarpone?
You could technically make a chai whipped cream, but it won’t be the same filling. The mascarpone gives this cream its thick, silky consistency and enough structure to hold the caramelized pears.
Why use both chai tea and spices?
The tea and spices are doing different things. Steeping actual chai gives the cream the black tea base that makes chai taste like more than just warm spices. The additional cinnamon, cardamom, ginger, and clove reinforce the spice notes so they aren’t lost once the cream is combined with mascarpone and paired with the sweet pavlova.

Can I Make Pavlova Ahead of Time?
Yes, and I actually recommend breaking up the components if that makes the recipe easier.
The pavlova shell can be baked ahead. Once completely cool, keep it at room temperature in a dry, airtight container. Don’t refrigerate an unfilled pavlova because refrigerator humidity can soften the crisp shell.
The chai-infused cream can be made the night before and kept covered in the refrigerator.
The caramelized pears can also be prepared ahead and refrigerated. For the very best texture and appearance, though, I prefer making them the day you plan to serve the pavlova and allowing them to cool to room temperature.
Wait to assemble everything until relatively close to serving.
How to Store Leftover Pavlova
Once the chai mascarpone cream and pears have been added, the pavlova needs to be refrigerated.
Transfer leftovers to an airtight container or loosely cover the remaining pavlova and refrigerate for up to 2 days.
Just know that pavlova is at its textural best shortly after assembly. The cream and pears gradually transfer moisture into the meringue, so the crisp shell will soften in the refrigerator. The leftovers are still delicious, but they’ll have a softer, more cake-like texture.
More fall favorites to try…

Caramelized Pear Pavlova with Chai Mascarpone Cream
Equipment
- Stand Mixer or Hand Mixer
- Large Mixing Bowl
- 8 in cake pan or plate for tracing
- Offset Spatula or Large Spoon
- Small Saucepan
- Large Skillet
Ingredients
Pavlova
- 4 large egg whites room temperature
- 1 cup superfine or caster sugar
- ½ teaspoon cream of tartar
- 1 ½ teaspoons cornstarch
- 1 teaspoon vanilla extract
- Pinch kosher salt
Chai Mascarpone Cream
- 1½ cups heavy whipping cream divided
- 3 chai tea bags
- 8 ounces mascarpone cold
- ⅓ cup powdered sugar
- 1 teaspoon vanilla extract
- ½ teaspoon ground cinnamon
- ¼ teaspoon ground cardamom
- ⅛ teaspoon ground ginger
- Tiny pinch ground cloves
- Small pinch kosher salt
Caramelized Pears
- 3 medium Bosc pears ripe but still firm
- 2 tablespoons unsalted butter
- 3 tablespoons dark brown sugar
- 1 tablespoon pure maple syrup
- ½ teaspoon vanilla extract
- ¼ teaspoon kosher salt
- 1 teaspoon fresh lemon juice

Instructions
Make the Pavlova
- Prepare the oven and pan. Preheat the oven to 300°F. Line a baking sheet with parchment paper. Trace an 8-inch circle onto the parchment using a cake pan or plate as your guide, then flip the parchment over so the marking is underneath. You'll still be able to see the circle through the paper without getting pencil or ink on the meringue.
- Make sure your equipment is completely clean. Before whipping the egg whites, check that your bowl and whisk are completely clean, dry, and free of any grease. Even a small amount of fat or egg yolk can interfere with the egg whites whipping properly.
- Begin whipping the egg whites. Add the room-temperature egg whites and a pinch of kosher salt to the bowl of a stand mixer fitted with the whisk attachment. Beat on medium speed until the whites become foamy and begin to hold very soft peaks. Add the cream of tartar and continue beating until soft peaks form. When you lift the whisk, a peak should form but flop back over rather than standing upright.
- Gradually add the sugar. Increase the mixer to medium-high. Add the sugar approximately 1 tablespoon at a time, waiting about 15–20 seconds between additions. Don't rush this step. Gradual incorporation helps the sugar dissolve properly and creates a more stable meringue.
- Whip to stiff, glossy peaks. After all of the sugar has been added, continue whipping until the meringue becomes thick and glossy and holds stiff peaks. When you lift the whisk, the peak should stand upright rather than collapsing.
- Rub a small amount of meringue between your thumb and finger. It should feel mostly smooth with little to no noticeable sugar grit. If it still feels distinctly grainy, continue whipping briefly and test again.
- Add the remaining ingredients. Sprinkle the cornstarch over the meringue and add the vanilla. Mix on low for only a few seconds, then use a rubber spatula to gently finish incorporating everything by hand. Avoid aggressively mixing at this stage because you don't want to knock excess air out of the meringue.
- Shape the pavlova. Spoon the meringue onto the center of your traced circle. Use an offset spatula or the back of a large spoon to shape it within the 8-inch guide, building upward rather than spreading outward. The finished pavlova should be approximately 2½–3 inches tall.
- Create upward swoops around the sides, then make a shallow well in the center, leaving a substantial raised edge. The well will eventually hold the mascarpone cream and pears, but don’t hollow the center all the way down.
- Bake. Place the pavlova in the preheated oven and immediately reduce the oven temperature to 250°F. Bake for 1 hour 20 minutes.
- Cool slowly. When the baking time is complete, turn the oven off but do not open the door. Leave the pavlova inside the closed oven for at least 2 hours, or until completely cool.
- Once cooled, the exterior should feel dry and crisp. The center will remain soft and marshmallow-like. Some cracking around the exterior is completely normal.
Make the Chai Mascarpone Cream
- Infuse the cream. Add ½ cup of the heavy whipping cream to a small saucepan and heat just until steaming. Don't let it boil.
- Remove from the heat, add all 3 chai tea bags, cover, and steep for 10 minutes. Remove the tea bags, gently pressing them against the side of the pan without aggressively squeezing them.
- Allow the cream to cool, then cover and refrigerate until completely cold, about 1–2 hours. The cream needs to be properly chilled before whipping.
- Start the mascarpone cream. Add the cold mascarpone, powdered sugar, vanilla, cinnamon, cardamom, ginger, cloves, and salt to the clean bowl of a stand mixer. Mix briefly on low speed just until smooth. Avoid beating the mascarpone excessively on its own.
- Add the cream. With the mixer running on low, gradually pour in the completely chilled chai-infused cream, followed by the remaining 1 cup cold heavy whipping cream.
- Once incorporated, increase to medium speed and whip until the mixture reaches medium-stiff peaks. It should look smooth and silky and be firm enough to hold its shape when spooned, while the tip of a peak may still curl slightly.
- Watch it closely as it thickens. Mascarpone cream can become grainy if over-whipped. Refrigerate until assembly.
Make the Caramelized Pears
- Prepare the pears. Peel and core the pears, then cut them into wedges approximately ½ inch thick. Try to keep the wedges relatively even so they cook at approximately the same rate.
- Begin caramelizing. Melt the butter in a large skillet over medium heat. Add the pear wedges in as close to a single layer as possible.
- Let them cook relatively undisturbed for 2–3 minutes so the first side can begin developing color. Gently turn the pears and cook for about another 2 minutes.
- Make the caramel. Add the dark brown sugar, maple syrup, and salt. Gently turn the pears to coat them without breaking them apart. Continue cooking for another 2–4 minutes, until the pears are tender and glossy and the butter and sugar have formed a caramel-like sauce.
- Test a pear with the tip of a knife or fork. It should be tender but still hold its shape rather than turning mushy.
- Finish and cool. Remove the skillet from the heat. Add the vanilla and lemon juice and gently toss.
- Transfer the pears and their caramel out of the hot skillet and allow them to cool completely. Do not put warm pears onto the mascarpone cream.
Assemble the Pavlova
- Transfer carefully. Once completely cool, carefully move the pavlova to your serving plate or board. Pavlova shells are extremely delicate, so some small cracks or flakes breaking away are normal. Avoid repeatedly moving it once it's on your serving surface.
- Add the cream. Spoon the cold chai mascarpone cream generously into the well in the center. Let it mound naturally while leaving some of the crisp pavlova visible around the outside.
- Add the pears. Arrange the cooled caramelized pear wedges over the mascarpone cream. Layer and overlap them rather than pressing them into the cream.
- Finish and serve. Spoon a small amount of the thick caramel from the pear skillet over the pears. Avoid adding excessive liquid because moisture will soften the meringue.
- Serve soon after assembling for the strongest contrast between the crisp shell, marshmallow center, silky mascarpone cream, and caramelized pears.
Notes
Nutrition
Key Takeaways
- Pavlova is a unique fall dessert featuring chai-flavored mascarpone cream and caramelized pears, offering a delightful mix of textures.
- The recipe emphasizes technique, especially in whipping egg whites and adding sugar gradually for optimal meringue consistency.
- Common mistakes include rushing the sugar, assuming cracks mean failure, and spreading meringue too thin.
- You can prepare components ahead of time, but assemble the pavlova close to serving for the best texture.
- Store leftovers in the refrigerator, but be aware that the crisp shell will soften over time.


Leave a Comment