
Estimated reading time: 14 minutes
There is something about a soft winter white cake that just feels special this time of year. It is simple, clean, and cozy, and it always looks so pretty on the table without needing any complicated steps. This is the kind of cake I love making when I want something that tastes amazing, looks impressive, and does not take a ton of effort. The cake itself is incredibly easy. It stays soft, it has that classic vanilla flavor, and it bakes up into a pale, fluffy crumb that instantly feels wintery.
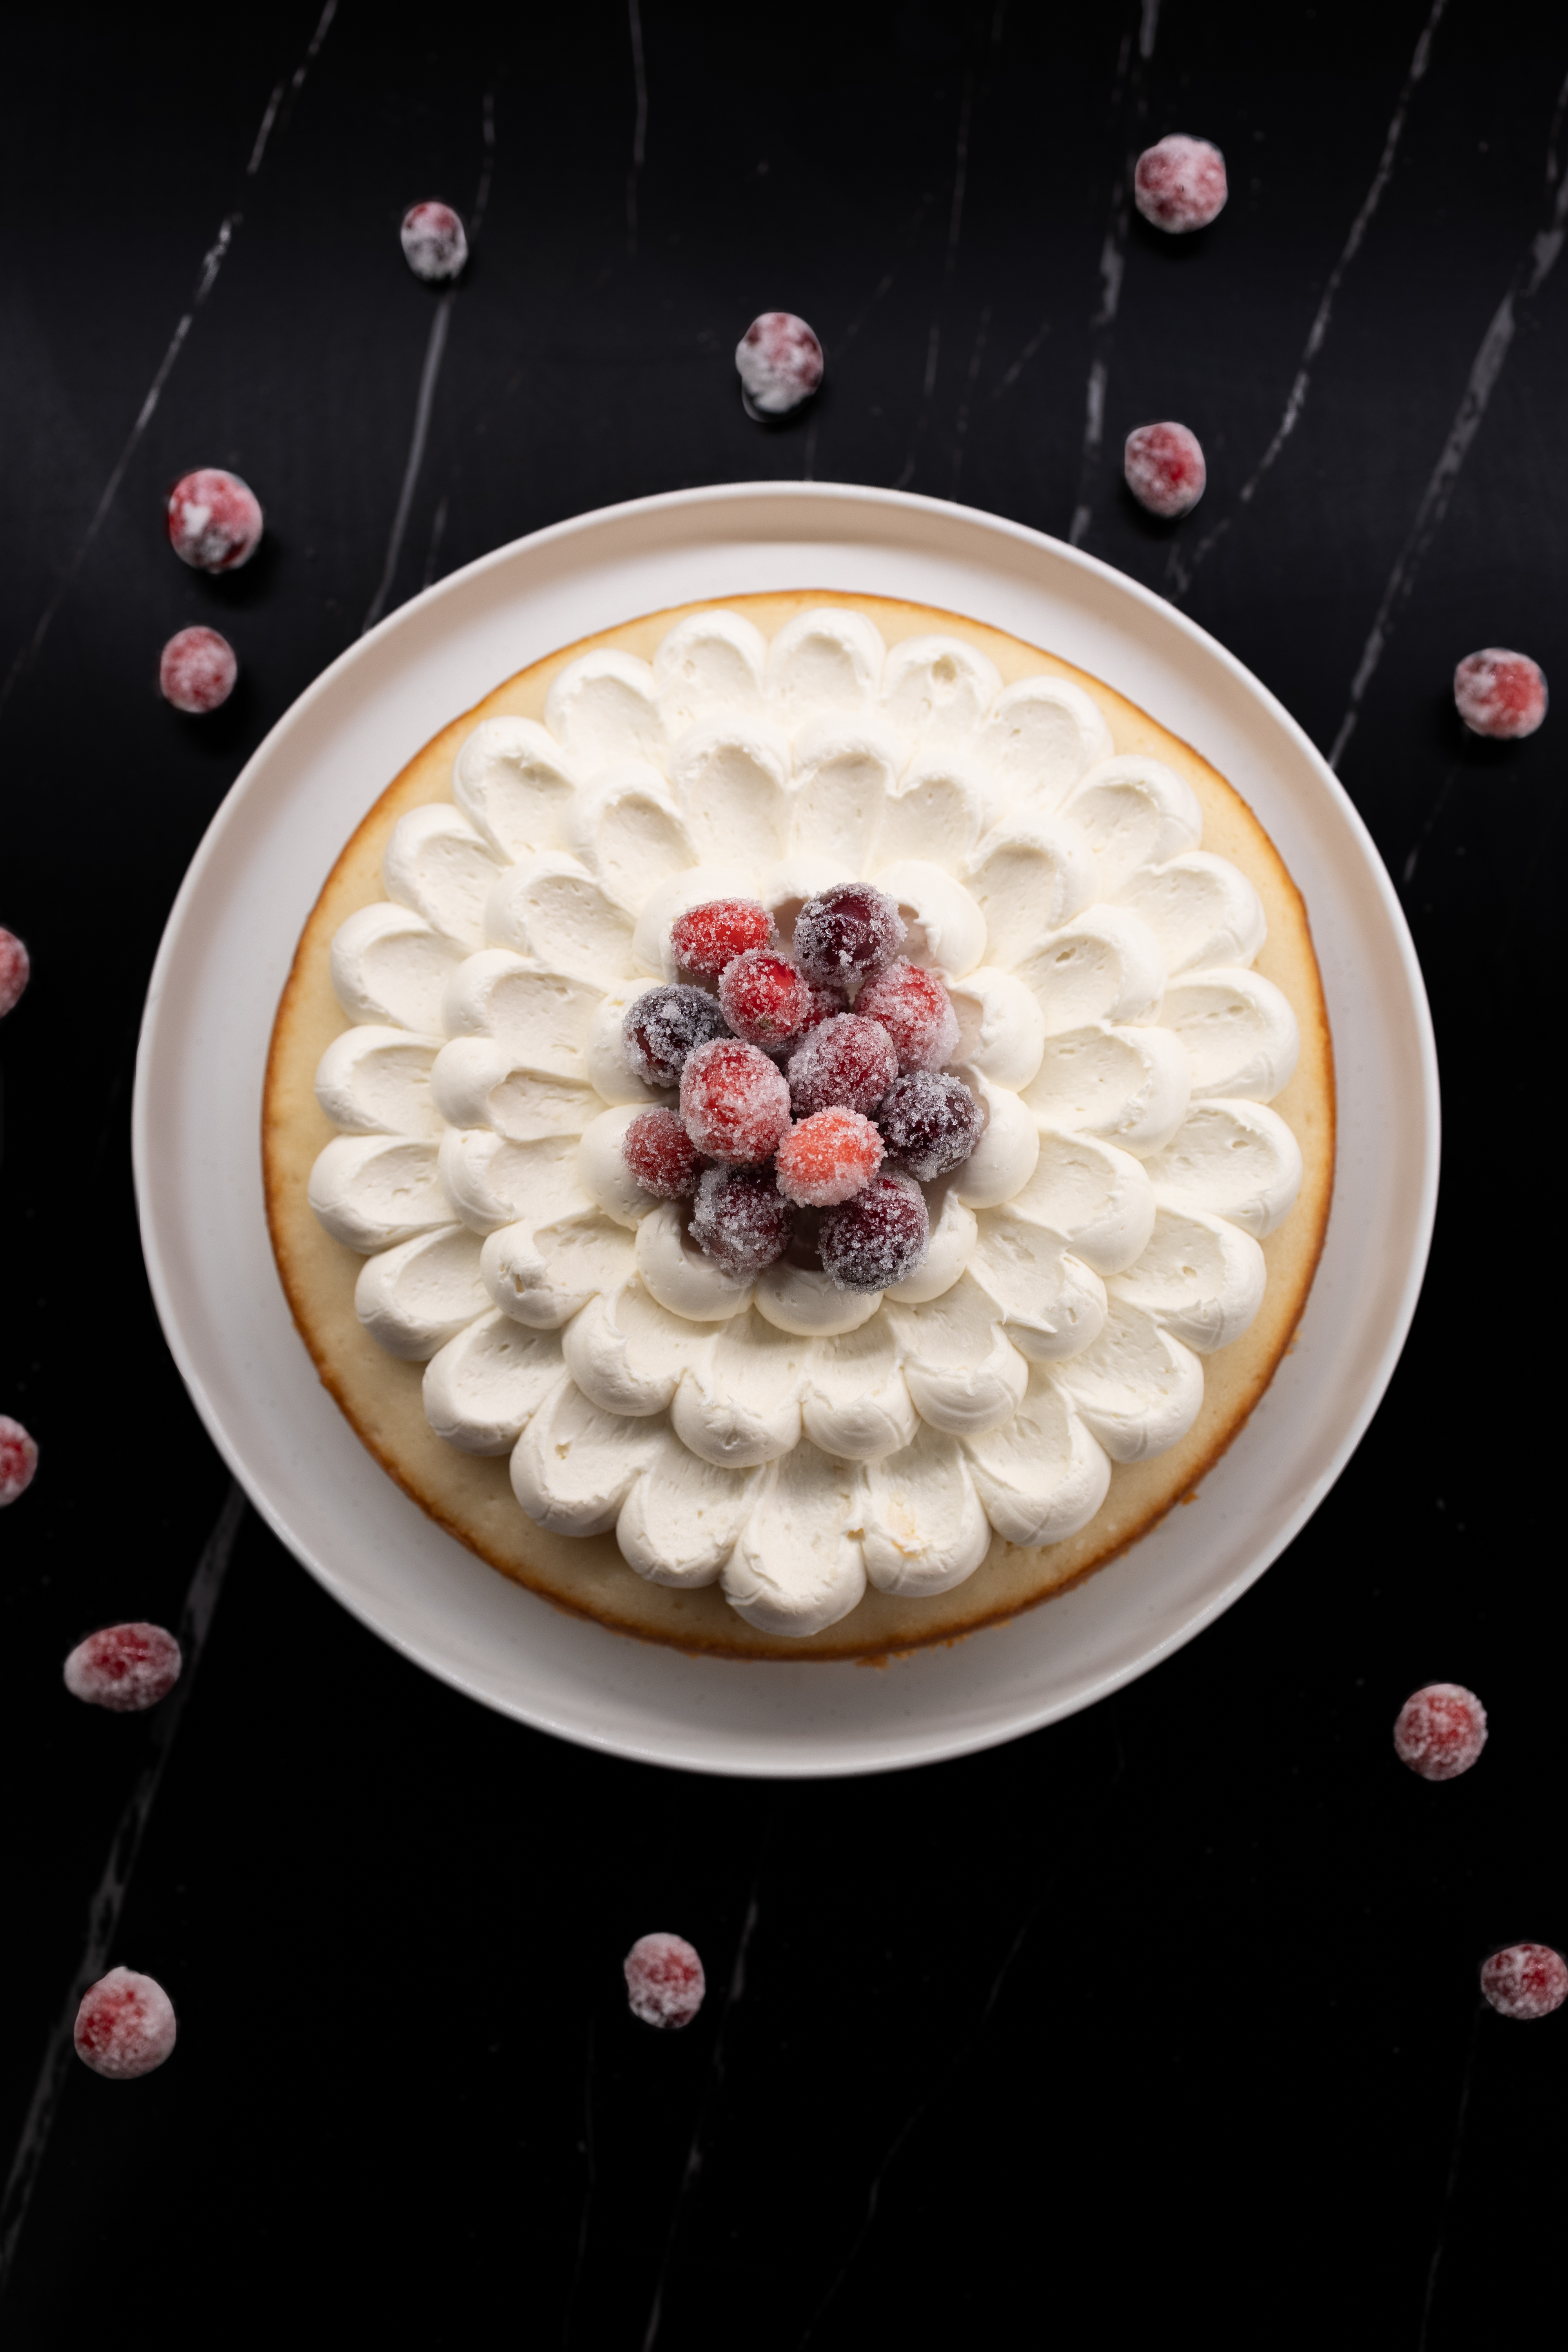
What really makes this recipe shine is the frosting design. If you have ever seen those beautiful snowy cakes with the little piped dollops on top and thought they were too hard to recreate, this one will change your mind. The pattern is very simple and beginner friendly, but it looks like something you spent all afternoon decorating. A few quick dollops, a cluster of sugared cranberries in the center, and suddenly the whole cake looks like a holiday moment.
This is one of those recipes that works for everything. You can make it for a holiday dinner, a cozy Sunday baking day, or bring it to a winter party and people will immediately think it came from a bakery. It is soft, pretty, and feels really nostalgic without being heavy or overly sweet. I love that it stays fresh for several days, so you can make it ahead and know it will still taste incredible.
If you want a cake that feels reliable, easy, and still has that wow factor for the holidays, this Winter White Cake is exactly that. It is simple to bake, fun to decorate, and so beautiful once the frosting and sugared cranberries go on top. Even if you are brand new to baking, you are going to feel proud of this one.
If you give this recipe a try, post a pic and tag @colbytroy on Instagram so I can see your beautiful creations!

Table of contents
Perfect Pairings with
Winter White Cake
This Winter White Cake pairs perfectly with cozy winter flavors that feel warm but not overpowering. A cup of vanilla tea, chamomile, or a lightly sweetened chai brings out the soft vanilla notes in the cake. If you want a brighter pairing, you can serve it with a spoonful of cranberry sauce or fresh berries. The tartness complements the sweetness and makes each slice feel refreshing and balanced.
This cake also works beautifully alongside citrus desserts like lemon bars or orange loaf cakes because the clean citrus flavors help highlight the delicate crumb of the white cake. For a more indulgent pairing, a scoop of vanilla ice cream or a cloud of lightly sweetened whipped cream adds a creamy contrast that still keeps the overall dessert feeling light.
Ingredients
Dry Ingredients
- All purpose flour, 1 1/4 cups (156 g)
- Cornstarch, 1 tablespoon (8 g)
- Granulated sugar, 1 cup (200 g)
- Baking powder, 1 1/4 teaspoons (5 g)
- Fine salt, 1/4 teaspoon (1 g)
Wet Ingredients
- Unsalted butter, 1/2 cup (113 g), room temperature
- Egg whites, 2 large (about 60 g total), room temperature
- Vanilla extract, 1 teaspoon
- Almond extract, 1/2 teaspoon, optional
- Whole milk, 1/2 cup (120 ml), room temperature
- Sour cream, 1/4 cup (60 g), room temperature
Buttercream
- Unsalted butter, 1/2 cup (113 g), room temperature
- Powdered sugar, 1 1/2 cups (180 g)
- Heavy cream or milk, 1 to 2 tablespoons (15 to 30 ml)
- Vanilla extract, 1 teaspoon
- Fine salt, pinch
Sugared Cranberries
- Fresh cranberries, 1/2 cup
- Water, 1 cup (240 ml)
- Granulated sugar, 1 cup (200 g) for the syrup
- Granulated sugar, 1/2 cup (100 g) for coating
You will have leftover simple syrup after soaking the cranberries. You can save it in the refrigerator and use it to sweeten tea or cocktails.

Nutritional Benefits
Flour provides the structure and helps give the cake its soft crumb. If you need a gluten free option, a cup for cup gluten free flour blend can work, though the texture will be slightly more delicate and more tender.
Cornstarch softens the crumb and gives the cake its smooth, fine texture. If you do not have cornstarch, you can replace it with the same amount of flour, but the cake will not be quite as tender.
Granulated sugar sweetens the cake and helps it retain moisture. There is no recommended substitution here if you want the same texture and crumb.
Egg whites keep the cake light and pale. They can be replaced with whole eggs, but the cake will become more yellow and slightly denser, which changes the white cake effect.
Unsalted butter creates richness and flavor, and it also helps trap air during creaming which gives the cake its soft structure. A dairy free butter substitute can be used, but the flavor and texture will change slightly.
Whole milk adds moisture and richness and supports a soft crumb. A lower fat milk will still work but can result in a slightly less tender cake. A dairy free milk can work if needed, although the flavor profile shifts.
Sour cream adds moisture and a subtle tang that helps the cake stay soft for several days. Plain Greek yogurt is a good one to one substitute and still keeps the crumb tender.
Powdered sugar ensures a smooth buttercream texture. For this frosting, powdered sugar is important for structure and there is not a direct substitute that behaves the same way.
Heavy cream or milk brings the frosting to the right consistency. Either option works and does not affect the structure of the cake, only the thickness of the frosting.
Cranberries provide a bright pop of color and tartness. They also add a bit of vitamin C. If fresh cranberries are unavailable, you can skip them entirely or use sugared rosemary sprigs for a similar winter look.

Step By Step Instructions
Follow these step-by-step instructions, then scroll down to the recipe card for a full ingredients list and method
How to Make Winter White Cake
To begin, prepare your 8 inch round cake pan by lightly spraying it and placing a parchment circle on the bottom. This step helps the cake bake evenly and release cleanly once it cools. Preheat your oven to 350 so the batter rises properly when it goes into the oven.

In a medium bowl, whisk together the flour, cornstarch, baking powder, and salt. Whisking the dry ingredients helps distribute the leavening evenly and prevents dense spots in the cake.
In the bowl of a stand mixer, beat the butter and sugar together for a full three minutes. This step is very important because it creates tiny air pockets that help the cake rise and stay soft. The mixture should be very pale, fluffy, and lighter in volume. If it still looks grainy or heavy, keep beating a little longer.

Add the egg whites one at a time, letting each one fully incorporate before adding the next. This keeps the batter smooth. Mix in the vanilla extract and the almond extract if you are using it.

Add half of the dry mixture to the bowl and mix on low speed until it is just combined. Add the milk and sour cream and mix again on low. Add the remaining dry mixture and mix just until the batter looks smooth. Overmixing at this stage can make the cake tough, so stop as soon as everything is combined.

Pour the batter into your prepared pan. The batter should sit slightly above halfway but below two thirds of the pan. This level helps the cake rise evenly without overflowing and gives you a nice, even top.
Bake for 28 to 34 minutes. The cake is done when the top springs back lightly when touched and a toothpick inserted into the center comes out clean. Let the cake cool in the pan for 10 minutes, then carefully invert it onto a wire rack and let it cool completely before frosting.
To make the buttercream, beat the butter until it is pale, smooth, and creamy. Add the powdered sugar gradually, keeping the mixer on low to prevent it from puffing out of the bowl. Add one tablespoon of cream or milk at a time until the frosting becomes smooth and pipeable. Add the vanilla extract and a pinch of salt, then continue beating for another two to three minutes to lighten the texture and create a fluffy frosting that pipes cleanly.
Decorating Tips and Piping Without Special Equipment
One of the best parts of this cake is how pretty the frosting looks with the little piped dollops on top, but you do not need any special piping tips to recreate the design. If you do not have a round piping tip at home, you can still create the exact same look by cutting the tip of your piping bag. Just snip off the end to create an opening about the size of a round piping tip. This creates a clean, round dollop and gives you full control over the frosting without needing extra tools.
If you do not have piping bags at all, a large zip top bag works perfectly. Add the frosting to the bag, push it toward one corner, and cut a small piece off the corner to form an opening. The key is to make a confident cut so the opening is round and smooth. Once you pipe a few dollops, the design comes together quickly and looks beautifully intentional.
To pipe the cake, hold your bag directly above the cake surface and gently squeeze until a small mound forms. Lift straight up to finish the dollop cleanly. Continue piping around the top of the cake, spacing the dollops evenly.
After piping the loops, take a clean kitchen teaspoon and gently place the back of the spoon at the center of one piped loop. Drag the spoon inward toward the center of the cake. This pulls the frosting into a soft petal shape.
Repeat this process around the cake, creating your first full row of petals.
Continue piping loops and dragging them inward to create a second row, slightly overlapping the first row for a fuller, layered look. Repeat again for a third row. Each row should move slightly closer to the center of the cake. The petal effect gives a snowy, elevated finish that looks intricate but is very easy once you get the rhythm.
Leave the center of the cake flat. This creates the perfect space for adding your sugared cranberries.
Once you add the sugared cranberries in the center, the cake looks snowy, elegant, and much more intricate than the effort it takes.

How to Make Sugared Cranberries
To make the sugared cranberries, start by creating a simple syrup. Add the water and 1 cup of granulated sugar to a small saucepan and warm it over medium heat, stirring until the sugar fully dissolves. Once the syrup is clear and the sugar has dissolved, remove the saucepan from the heat.
Add the fresh cranberries to the warm syrup. Gently stir to coat every cranberry. The cranberries will float, so to keep them fully submerged, you can place a small bowl or plate on top to gently weigh them down. Let the cranberries sit in the syrup uncovered overnight at room temperature. This longer soak allows the syrup to fully penetrate the skins, which gives the cranberries a sweeter flavor, a glossy finish, and a more stable coating once you roll them in sugar.
The next day, use a slotted spoon to lift the cranberries out of the syrup and let any excess drip off. Transfer them to a parchment lined tray. Add the remaining 1/2 cup of sugar to a shallow bowl and roll the cranberries in the sugar until they are evenly coated and look frosted and sparkly. Allow them to sit on the tray to dry slightly before placing them on the cake. They hold their shape well and keep their sparkle, which makes them a beautiful, long lasting garnish.

If you do not have overnight to wait…
If you need a same day option, you can still make sugared cranberries. Warm the sugar and water as directed to make the syrup, add the cranberries, and let them soak for at least 30 minutes. They will not absorb as much syrup as the overnight version, but they will become tacky enough for the sugar to stick. After 30 minutes, lift them out of the syrup, let the excess drip off, and roll them in sugar. Allow them to dry for another 10 to 15 minutes so the coating can firm up. The cranberries will be lighter and less sweet than the overnight version but still very pretty and perfect for a quick garnish.
Troubleshooting Tips for Beginners
My cake did not rise evenly.
This usually means the baking powder was not fully mixed into the dry ingredients or the oven was not properly preheated. Make sure to whisk the dry ingredients thoroughly and wait for the oven to reach 350 before placing the cake inside.
My cake sank in the center.
Opening the oven door too early or mixing the batter too aggressively can cause sinking. Keep the oven door closed for at least the first 25 minutes of baking and mix gently when you add the dry ingredients.
My cake turned out dense.
This often happens when the butter and sugar are not creamed long enough. Beat them for the full three minutes until the mixture becomes very pale and fluffy. Overmixing after the dry ingredients are added can also make the cake dense.
The edges of my cake are dry.
Dry edges indicate that the cake was baked too long or the pan was over greased. Start checking the cake at the earlier end of the bake time and use a light, even coating of spray.
My frosting is too thick to pipe.
Add a small amount of cream or milk, one teaspoon at a time, until the frosting becomes smooth and pipeable.
My frosting is too thin.
Add more powdered sugar, one tablespoon at a time, until the frosting thickens and holds its shape.
My sugared cranberries are not sticking to the sugar.
This usually means the syrup on the cranberries is not tacky enough. Let them sit in the syrup longer if you have time, or let them drain for a few extra minutes before rolling them in sugar so the surface can become slightly sticky.
Storage Instructions
Immediate Storage
Once the cake has cooled fully and has been frosted, it can be stored at room temperature for up to one day. Keep it lightly covered with plastic wrap or in a cake container so the crumb stays soft.
Refrigeration
For storage beyond 24 hours, place the cake in an airtight container and refrigerate it. The cake will stay fresh for up to three days. Before serving, let it sit at room temperature for about 30 minutes so the texture softens and the flavors come forward again.
Freezing
This cake freezes very well before frosting. Once completely cooled, wrap the unfrosted cake tightly in plastic wrap and place it in a freezer safe bag or container. Freeze for up to two months. When you are ready to use it, thaw the cake in the refrigerator overnight, then bring it to room temperature before frosting and decorating with buttercream and sugared cranberries.

Tools You’ll Need to Make
Winter White Cake
- 8 inch round cake pan
- Parchment paper
- Stand mixer or handheld mixer
- Rubber spatula
- Mixing bowls
- Whisk
- Cooling rack
- Small saucepan
- Slotted spoon
- Piping bag or zip top bag
More Yummy Recipes to Try

Winter White Cake
Ingredients
White Cake
- 1 1/4 cups all purpose flour
- 1 tbsp cornstarch
- 1 cup granulated sugar
- 1 1/4 tsp baking powder
- 1/4 tsp salt
- 1/2 cup unsalted butter room temperature
- 2 large egg whites
- 1 tsp vanilla extract
- 1/2 tsp almond extract
- 1/2 cup whole milk room temperature
- 1/4 cup sour cream
Buttercream
- 1/2 cup unsalted butter room temperature
- 1 1/2 cup powdered sugar
- 2 tbsp heavy cream
- 1 tsp vanilla extract
- pinch of fine salt
Sugared Cranberries
- 1/2 cup fresh cranberries
- 1 cup water
- 1 cup granulated sugar for the syrup
- 1/2 cup granulated sugar for coating
Instructions
- Prepare the Cake Pan. Preheat your oven to 350. Lightly spray an 8 inch round cake pan and place a parchment circle on the bottom. This helps the cake bake evenly and release cleanly once cooled.
- Mix the Dry Ingredients. In a medium bowl, whisk together the flour, cornstarch, baking powder, and salt until everything looks evenly combined. This prevents dense areas in the cake.
- Cream the Butter and Sugar. In a stand mixer or with a handheld mixer, beat the butter and sugar for a full three minutes. The mixture should become very pale, fluffy, and lighter in texture. This step is what gives the cake its soft, delicate crumb.
- Add the Egg Whites and Extracts. Add the egg whites one at a time, mixing well after each addition so the batter stays smooth. Add the vanilla and the almond extract if you are using it.
- Combine the Wet and Dry Ingredients. Add half of the dry mixture to the bowl and mix on low until combined. Add the milk and sour cream and let them blend in. Add the remaining dry mixture and mix just until the batter becomes smooth. Stop mixing as soon as it comes together to avoid a dense cake.
- Fill the Cake Pan. Pour the batter into the prepared pan. It should fill the pan slightly above halfway but below two thirds. This amount rises into the perfect single layer cake without spilling over.
- Bake the Cake. Bake for 28 to 34 minutes. The cake is done when the top gently springs back when touched and a toothpick inserted into the center comes out clean.
- Cool the Cake. Let the cake cool in the pan for 10 minutes. Then carefully invert it onto a cooling rack and allow it to cool completely before frosting. The cake must be fully cooled or the buttercream will melt.
Buttercream Frosting and Decorating Instructions
- Make the Buttercream. Beat the butter until it becomes pale, smooth, and creamy. Add the powdered sugar gradually on low speed so it incorporates without clumping. Add one tablespoon of cream or milk at a time until the frosting becomes smooth, soft, and pipeable. Add the vanilla and a pinch of salt. Then beat the frosting for an additional two to three minutes to lighten and aerate it. This gives you a very smooth, silky buttercream that pipes beautifully.
- How to Pipe the Loops Without Needing Special ToolsIf you have a round piping tip, fill a piping bag fitted with the tip. If you do not have a tip, simply cut the end of a piping bag to create a round opening that is about the size of a standard round tip. If you do not have piping bags at all, a large zip top bag works perfectly. Add the frosting, push it into one corner, and cut a small opening at the corner.Hold the bag straight above the cake and pipe small loops or rounded mounds across the surface. Aim for loops that have a little height so you can shape them in the next step.
- Shape the Loops Into Petals Using a Kitchen Teaspoon. After piping the loops, take a clean kitchen teaspoon and gently place the back of the spoon at the center of one piped loop. Drag the spoon inward toward the center of the cake. This pulls the frosting into a soft petal shape.Repeat this process around the cake, creating your first full row of petals.Continue piping loops and dragging them inward to create a second row, slightly overlapping the first row for a fuller, layered look. Repeat again for a third row. Each row should move slightly closer to the center of the cake. The petal effect gives a snowy, elevated finish that looks intricate but is very easy once you get the rhythm.Leave the center of the cake flat. This creates the perfect space for adding your sugared cranberries.
Sugared Cranberries
- Prepare the Simple Syrup. Warm the water and 1 cup of granulated sugar together in a small saucepan over medium heat until the sugar dissolves completely and the syrup looks clear.
- Submerge the Cranberries. Remove the pan from the heat and add the fresh cranberries. Cranberries float, so gently press a small bowl or plate on top to keep them fully submerged. This helps them absorb the syrup evenly.
- Soak Overnight. Let the cranberries sit uncovered in the syrup overnight. This gives them time to soak up the syrup, become sweeter, and develop a glossy surface.
- Coat in Sugar. The next day, lift the cranberries from the syrup with a slotted spoon and let the excess drip off. Roll them in 1/2 cup granulated sugar until coated. Let them sit for several minutes to dry. They will look frosted and sparkling.
- Decorate the Cake. Place a small mound of sugared cranberries in the center of the frosted cake. The contrast of the sparkling berries against the snowy frosting completes the winter theme.


Leave a Comment